Pages

Showing posts with label learn. Show all posts

How to Access Advanced Power Options in Windows 7?

Although the sole purpose of using MS Windows 7 in a powerful desktop PC is all about gaming :P... thus accessing advanced power settings makes little sense to most. But, if you use a portable device, say something like an Ultraportable Laptop or a Netbook, etc then configuring few advanced power settings concerning Windows 7 can come in handy.

When it comes to desktop UI designs it maybe true that you can learn a lot of from Apple Mac but the Gnome desktop developers can also learn a great deal from Microsoft. For instance, in Windows 7 (including Vista) Microsoft has done an excellent job of creating a pretty simple power related configuration window which is really good for the newbies since it doesn't "touch" a lot of advanced settings.

But unlike with the GNU/Linux default desktop, the Gnome, if you'd rather like to have some additional control over the computer then you easily do so in Windows 7. Most of the average users like me know how to do this. But for those who don't ... this is how you access that additional configuration settings that lets you change a big list of advanced settings concerning the ACPI of your PC.

1. First click on the Batter or the Charger icon on your notification area and from the window choose "More power options" as shown in the below screenshot.


2. Then from the next window that you get, choose the "Power plan" that you want these settings to be applied and click on the Link next to it that says "Change plan settings" which should bring a new window similar to the below one.


3. From the next window that you get, look for the bottom section and click on that says "Change advanced power settings" as with below picture.


Once you click on this link you should be reveled by a new window that lets you configure a lot of advanced power settings concerning your hardware through the ACPI (advanced configuration and power interface, a standard) and using this you can change some big number of settings such as:

Note: If you click on the "Change settings that are..." (marked in Red) link, then it'll only display the settings that are not available in the default/simple configuration window...
*. Manually change the Hard-Disk turning off time.

*. Pause the desktop background slide-show.

*. Change whether the Wireless adapter should give you the maximum performance or maximum power efficiency.

*. Enable/disable wake timers, change auto hibernate time or enable the Hybrid sleep mode (turned on by default for Desktops), etc.

*. PCI Express cards related settings.

*. Change Advanced Processor related settings such as: Cooling policy, Minimum processor state or Maximum processor usage limiter (which can have a significant effect on your battery life if you know how to balance things a bit :D), etc.


*. Display related settings.

*. Multimedia related settings such as : Enable/Disable media sharing, switch between performance and low power mode while playing videos.

*. Internet Explorer related Javascrpt timer setting.

*. GPU related settings.

My personal favorite is few of the settings that this window allows you concerning the battery. For instance, if you're trying to calibrate your battery then sometimes it's important to let it completely drain itself (0% or somewhere near). But by default, Windows will put your Laptop into Sleep mode when it reaches a certain point in its battery life (default is 7%) which is called "Reserve battery level".


But if you forcefully disabled it then when the battery reaches about 5%, Windows WILL put your computer into Hibernate mode which in this case (we're trying to calibrate the battery, remember? :D) is not what we want since we'd like our battery to die to its absolute zero or close. So in that case, you can use this window to re-configure and completely disable that default action which is very handy in my experience.

But once you're done with the calibration make sure to set things in their default values since these power modes do help to recover your PC from failures. Also remember except for some (such as the mentioned "Better critical..." settings) most of these settings are automatically adjusted when you change settings in the "Power Plans' window. But this configuration window gives a lot of advanced options that are sometimes necessary to get the most out of your PC nonetheless. Good luck.

How to Access Few "Advanced Preferences" Settings in Nautilus File Manager?

Nautilus is the default file management utility in Gnome desktop environment (which is also shared by the Ubuntu Unity as well). Although Gnome had been folliwng a lot of Mac OSX type desktop design ideas for a long time now, thus it's a highly simplified desktop these days. Yet in the past it used to come with a hell lot of options or customizable abilities.

Luckily, for the advanced users ;-), we can access some of those "dropped" features via the built in Gnome desktop database configuration utility called Gconf Editor. So using this we can change few additional settings concerning Nautilus with ease which are otherwise, "hidden".

For instance, once right click-ed on a file/folder and accessed its properties, currently Nautilus does let us change the permissions with a pretty simplified window which is cool. But...

There's certainly nothing wrong with this... but I just happened to like the "old" window since it helps to speedup things a bit (adding permissions I meant :D)...
... if you want a little more control over the file and folder permissions window (including few more options such as set user and group IDS, sticky) and in comparison, this "advanced permissions" (it's not that advanced actually since the default one come with almost all the features, except for those mentioned "3" features) makes it easy to adjust the permissions in my experience.

But some of these preferences are already in the default "preferences" section in Nautilus but you can access few additional settings such as:

The "preferences' section of Nautilus in Gconf-editor's database...
*. Make Nautilus always display a "location entry" type bar rather than the default "Path bar".

*. Directory limit: Another useful feature (not for all the users though). For instance, let's say that you have a folder filled with thousands of files, etc.

Although Nautilus is more than capable of handling a "heavy weight" folders these days yet if you have some "massive folders" then you can manually assign a number that Nautilus will take into account while dealing with them. The default value is "-1" means "unlimited". As said, I just mentioned this but I don't think most of us would wanna change this anyhow.

*. Disable/Enable mount forward and back buttons.

*. Change how Nautilus search for files (whether using just the "text" you typed or properties).

*. Show Desktop: Just like with Gnome 3 (yikes! :D), if you disable this function, then Nautilus will disable your Desktop completely. Although nothing on your desktop will be lost (created folders and files) but your mouse right click or anything on the desktop will be hidden!.

These are just a few to mention. Anyhow, how can you access these "hidden" preferences in Nautilus using the Gconf-editor?

1. Pretty simple actually. First press the "Alt" + "F2" keys and put the below command into the box and press enter.
gconf-editor

Now from your left, go to: "Applications" -> "nautilus" -> "preferences".

This should openup a window similar to to the below one. Now to your right side you should see few options which you can use to access some of the ones that are hidden by default.


For instance, let's say that I wanted to enable the "Advanced Permissions" dialog in Nautilus. Then, from the "Preferences" section scroll-down until you see an option called "show_advanced_permissions" and make sure to put a "tick" on its box which should give you a slightly "advanced" file/folder permissions windows as with below screenshot.


That's about it. Use it with caution ;-)...

How to Change the Display Screen's DPI/PPI Settings in Ubuntu?

DPI or dots per inch also stands for the tern pixels per inch. As the names suggest, it's measure of how close your monitor's pixels are to one another. When comparing with the recent Windows 7 operating system that's optimized for 100 DPI display screens... GNU/Linux still uses the 95 DPI (is also the Windows Vista's default settings) and there might be occasions that this could come in handy.

Why this is important?

As said, not everyone gonna need it. But since most of the never Netbooks or display screens in general have very sharp DPI settings (because those pixels are fixed into a smaller screen size) thus things may look a little too small and if you've been used to seen big text and windows "thanks" to your previous old computer... then you can certainly try changing the DPI in Ubuntu (or any other OS in that instance) to try to make things look a bit bigger.

Accessing DPI settings in Ubuntu (or in Gnome classic desktop to be more accurate) is fairly simple. And I'm pretty sure almost all the Ubuntu (or Gnome geeks) know this... but if you're a bit new to Ubuntu and wondering ... then this is how you do it.

1. Just right click on your desktop and choose "Change Desktop Background".

2. Then click on the "Fonts" tab and under the sub heading "Rendering" click the "Details" button which should open-up a window similar to the below one.


3. By default Ubuntu or the Gnome classic desktop is optimized for the 96 pixels per inch but you can lower or increase the value to make things look more smaller or bigger.


But remember. the best possible (meaning sharp and clear windows, buttons, etc) setting for your OS is the default DPI that it comes with. And if you go below or beyond this "default" value that it's optimized for... then things may not look that sharp. But you can try lowering these values here and there ... you know experiment a little.

You can also use this window to optimized font rendering settings to enhance their readability as well. 

Remember the "magic number" ;-)...
Since there's no "revert to defaults" button, 96 is the default dpi value. And remember, not all the applications work for these dpi settings and say that you have a third-party application installed that doesn't support a lot of dpi scaling then it might look (fonts, etc) a bit blurred, etc after changing the default dpi value. But luckily, we can always come back to the default settings.

How to Run Ubuntu 11.04 Natty Narwhal (Unity) in Acer Aspire One 722 Netbook?

Few days ago suddenly out of nowhere the Acer Aspire one 722 (BZ454 to be precise) fell into my hands :P. It came pre-loaded with MS Windows 7 Home Premium (64-bit). But as soon as I got it, I just wanted to try Ubuntu Linux 11.04 in it (obviously). Since, it doesn't have an optical drive, I went with creating a Live Ubuntu USB disk but it did not work!.

Oh it boot the OS alright ... but after displaying the pretty Ubuntu logo, bugger just freezed!. I then search in few forums and realized that others are also having the same issue. I honestly don't know what really is the issue here... but for some reason it just freezes the whole screen.

I also had a bit similar issue with my now old Laptop while I was trying Ubuntu 11.04 using the LiveCD but was able to fix it by first not choosing to run Ubuntu as a live environment but went for the installation straight ahead.

Dudes, I really got in running! :D...
So, since the 722 also comes with a AMD Radeon GPU (which are a bit troublesome with Compiz) I tried the same thing with the Acer Aspire One 722 but when Ubiquity (Ubuntu's live Installer Wizard) was just about to launch itself, again, the Netbook just got stuck, again.

This time I saw the Wi-Fi card is turned on automatically thus I guessed that it might be the Wi-Fi detection problem which is pretty common with GNU/Linux these days.

Anyhow, just out of curiosity, I decided to give it a try, again, and this time, when the USB boot-menu was loaded, I pressed the "F6" button and chose "ACIP-Off" option. The system booted but when it arrived where previously freeze-d, this time I got an error message (except for the stuck-non-informative window as with previous occasions) saying that the installer cannot find a live file-system to operate.

Now, I'm not an expert on how GNU/Linux Live "environments" work. But when I was creating my Boot-able USB disk I choose the option that says "Discarded on shutdown, unless you save them elsewhere".

the second option is not selected by default... but I guess most of us just use it thus this is where I made my mistake (at lest I thin this is the reason)
So, I just thought re-creating a USB disk using the suggested/default settings called "Stored in extra reserved space" which I did and then, plug-in the USB disk and decided to go with the default Ubuntu 11.04 Live environment and guess what?, it worked!. 

Just make sure that you've chosen this one (selected by default)...
Now I'm not entirely sure what's the real cause here, but I've tested this two times and after going for the default settings, now I can use Ubuntu 11.04 in their pretty Unity desktop interface (yep with Compiz running) even after considering the fact that the Acer Aspire One 722 comes with the AMD fusion (APU - Advanced Processing Unit) which is only fully supported in the Kernel 3.0+, but even after without having that Kernel version + the proprietary AMD/ATI drivers... the Aspire One 722 runs pretty decently without any crashing incidents :).

But to be honest, even after considering the power of the included AMD Radeon HD 6250 (256MB dedicated graphics memory, 280Ghz internal clock speed if I'm not mistaken) Unity does feel a little slow since the proprietary AMD/ATI drivers are significantly faster than the open-source drivers, you should install the proprietary drivers if you want the best possible performance out of that GPU.

And also, if you also have this Netbook, then it should be pretty interesting what the upcoming Ubuntu 11.10 could bring from a performance point of view because with 11.10, Canonical is shipping the Kernel 3.0 for the first-time which fully supports the AMD Fusion architecture by default.

Anyhow, the performance even while on the Live USB environment is really good (I'm even writing this post in it!) but it should be even better after installing in the HDD.
 
So, if you're having troubles with trying to run Ubuntu 11.04 Natty Narwhal in Acer Aspire One 722 Netbook, then while creating that USB disk, just try the default settings as shown in the third screenshot. Good luck.

Oh and one more thing, the 11.6 inch display has a a resolution of 1366x768 thus things could look a bit too small for some but thanks to the Ubuntu or the Gnome desktop's DPI settings, I think Ubuntu Linux looks + makes things slightly bigger than the original MS Windows 7 thus Ubuntu is certainly my preferred choice while using this Netbook.

How to Disable System Restore in Windows 7?

System restore is a pretty useful feature which was implemented by Microsoft in their Windows operating system for restoring your whole system (OS) to a previous state (which is defined by application installations, etc as many knows). But I personally don't like this at all because it has drawbacks rather than useful ones (at least in my opinion).

First, it uses my valuable HDD space for which I cannot blame the OS. But most importantly, even after doing a system restoration, afterwards, you may not be able to uninstall applications (properly) as usual by using Control panel or uninstallers in the applications, etc. So in a way, even though it is certainly helpful (where you can restore your entire OS to a previous point without having to re-install it, etc) but I'd like to manually disable the System restore feature in MS Windows (7 in this case).

How to do that?

Pretty easy actually, just follow the on screen instructions.

1. First right-click on your "My Computer" icon and from the menu choose: "Properties".


2. From the next window, to your left, choose, "Advanced System Settings".


3. Now from the next window, choose the tab called "System Protection".


Once you click on that, you should see a window that shows you details such as current disk usage, the partitions that are being used, etc. Now choose a partition and under "Protection" if it says "On", then it means that Windows is using space on that drive for system restore feature.

4. Just click on a partition and simply click on the button called "Configure" and from the next window under "Restore Settings", choose "Turn off system protection".


5. Now click on the "Apply" button and then press "OK" to close the window.

If you have multiple partitions, then you'll have to manually disable them all using the same method. That's how you completely disable the "troublesome" (not always though :D) system restore feature in Microsoft Windows 7 (Vista instructions should also be similar).

How to Create a USB, Bootable ISO image in Ubuntu?

Although the optical disk ain't gonna be dead anytime sooner ;-) yet because of the popularity of netbooks or Tablet PC type electronic gadgets and when it comes to installing Ubuntu operating system in on them, USB devices (such as pen drives for instance) is the least expensive and sometimes the only way to perform the installation.

Even if you have an Optical drive, still trying a GNU/Linux liveCD on a USB drive is the best option in my opinion when compared with a original method of burning it into a CD/DVD because there are few advantages.


1. They're noiseless!:

Well, if you want the experience the best performance while trying the LiveCD and if you're burning a CD/DVD, then you should go for the maximum amount of Burning speed so the LiveCD/DVD will be able to perform tasks in a much speedier way.

But that'll also make it a bit noisy, don't you think?. But a USB drive is noiseless!.

2. Faster than CD/DVDs (most of the time):

Unless you have a bit older USB stick/pen-drive, most never pen drives have really higher MB output thus you'll be experiencing a much more faster LiveCD "experience" in comparison with the CD/DVD method. Although not at its best, this will also help you to get a better idea of the actual (close) performance of the OS it self.

But as said, this might not always be the case since SATA or SSD drives are a hell lot faster than most of the USB drives nonetheless :).

Anyhow, in that sense, if you have already installed Ubuntu in your Netbook for instance, but wondering how to create/burn the recently downloaded never version of the Ubuntu ISO image into your USB disk... did you know that Ubuntu comes pre-installed an application called "Usb-Creator" (which is basically a GTK front-end that uses the "usb-creator" command-line tool) that lets us does exactly that!.

Main features...


*. As said, it's a default app thus if you're running a never version of Ubuntu, this you don't have to manually install it (comes pre-installed in Ubuntu 8.10 and above).

*. Lets you burn Ubuntu ISO images to any USB media. Although I'm not sure but you might also be able to use a different GNU/Linux (other than Ubuntu) with it too... but not sure though.

*. Save your documents: Unlike with a LiveCD, with a USB disk, by using this tools we can manually assign how much of MB to be reserved for saving our documents that we create while using the Live Ubuntu OS which we can retract at a later time. Again this is impossible with a LiveCD.

Requirements...

*. You must have an Ubuntu version 8.10 or above.

*. At last 1GB of free space.

*. The image has to the Ubuntu desktop edition (which is the most commonly downloaded one anyhow).

As said, to launch this, you first need a Computer that's already have Ubuntu installed.

Then log-into your desktop and put an insert an empty USB disk to your computer. Then press "Alt" + "F2" keys and put the below command and press the enter key. 
usb-creator-gtk

1. Now, this should open up a window similar to the below one. From the GUI, under "Source disk image...", open your ISO image by navigating to the location OR if you have an Optical drive with a LiveCD already loaded, this it'll display it too and let you burn the content of that LiveCD directly to the USB disk as well.


3. As with my screenshot, if you found that the options to manually enter documents space is disabled, that's because (in my case) I don't have at least 1GB of space left.

4. So in that case, backup all your data and then simply press the "Erase DISK" button to remove all your data on the USB disk (warning: this will remove all of the current data on the USB drive!).

And then you should be able manually assign the space for your documents data OR completely disable that function by clicking on the "Discarded on shutdown, unless you save them elsewhere" check mark. 

5. After making all the changes, just press "Make Startup Disk" button and the Usb-Creator should automatically "burn" the Ubuntu ISO desktop image to your USB disk!.

Well, that's about it. Before booting using the USB disk, make sure you've setup the BIOS to use USB as the default boot-device location (I know you knew that but just in case :D). Good luck.

How to Remove the "Ubuntu Modifications" in Firefox Web Browser?

Ubuntu uses the highly secured Firefox :) as the default web browser... but Mark Shuttleworth did say that in the future Ubuntu "might" switch to the faster, more simpler Chrome web browser.

Anyhow, as a way of branding and giving/enabling the users more optimized Ubuntu experience, Ubuntu developers make sure to add their own customizations to the Firefox web browser that comes in the default ISO image + in the repositories which you'd use to install the latest versions in the future, etc. .

If needed, we can disable these "Ubuntu changes" permanently OR temporarily (in case you wanted them back) since these settings are implemented using the Firefox Extension API (it's added as an Extension).

But before doing that lets have a look at what this Firefox extension does...

*. Set the Homepage to Ubuntu Start (which can be quite useful since it's like the online "Ubuntu-Pedia" where you can ask and find almost anything about Ubuntu :D).

*. Restart notification after an Upgrade:

Say that you upgraded your Firefox web browser to a never version, then when having this Extension, it'll make sure to automatically "notify" you to do a restart of the Browser to apply the changes.

*. Adds ask.com as the default search engine (weird, I don't know why).

*. Search for plugins in Ubuntu software Catalogue.

*. Adds the official Ubuntu release note to the Help menu...

But most importantly, this add-on/extension enables us to easily install software (automatically adds PPA, etc) by just clicking on a URL (which is called "apt://" protocol) and then launch either Synaptic or Ubuntu Software Center to install them. For instance, just click on this link (which is a URL that uses the "apt://" protocol) and see what happens.

Result of a "apt://" URL...
So after removing you'll lose these features and the above mentioned, most important (useful) feature too. But interestingly, after temporarily disabling it in the Firefox extensions section, the "apt://" protocols still worked in my Firefox ... perhaps we have to completely remove the package to make it completely disable that feature.

1. Anyhow, as said, if you want to temporarily disable it, then launch your Firefox web browser and from the menu bar click on: "Tools" -> "Add-ons"

2. And then from the window that you get, to your left go to: "Extensions" and then from your right side select:

"Ubuntu Firefox Modifications" and click on the "disable" button.

Step: 1

Also remember to click on the "Restart now" link to apply the changes
But if you want to completely remove it, then open your Terminal window and enter the below command.
sudo apt-get purge xul-ext-ubufox
If you wanted to get it back later ;-), then use the below command to manually install it.
sudo apt-get install xul-ext-ubufox

Well, that's about it. Not the most useful post of all but but ;-)...

How to Access "Power Management" Settings in Ubuntu 11.04 Natty Narwhal?

Okay, before I piss off the "usual Ubuntu users", this post is for the absolute newbies! :). So, after installing Ubuntu for the first time (yikes!) in your Laptop or Netbook (even in your desktop), have you been wondering about how to access some of the power management settings in Ubuntu?.

If so, then this post it for you. Also remember, these settings should also work in both Unity desktop and Gnome classic because Unity (the desktop with a left side panel and stuff :D) also inherit a lot of Gnome classic desktop's functions and applications. For instance, it still uses Nautilus as the file manager, etc.

Anyhow, to access these power management settings, simply click on the right-edge of your screen (as in the below screenshot) and from the menu choose "System Settings".

1
Now after clicking on this menu should open-up a new window which is known as the "control center" that lets you access various options of Ubuntu OS with ease.

From the "control center" window, click on "Hardware" to your left and then from your right-side click on "Power Management" which should open a new window as shown in below screenshots.

2

3

4: Here it is...
Now, as you can see with the above window you can change a lot of advanced power management related settings with ease.

For instance, by default every time you close the lid of your Laptop Ubuntu will put it to suspend (stand-by mode) but my Laptop due to few issues fails to "wake up" afterward!.

If this is the case with you too, then you SHOULD disable it (of course, I know that Gayan! :D) by clicking on the drop-down menu right-next to that which says

"When laptop lid is closed" (as in below screenshot). My choice is "Blank screen".


As you can see, you can also change other settings such as "Spin down" your hard disks (if possible) which helps to save some of that batty life, set screen brightness, dim display when "idle" + a few other options once you click on the "General" tab (in the below screenshot).


If you have questions, just throw in some comments and I'll do my best to answer them :). Goo luck.

How to Add a User in Ubuntu?

If you use Ubuntu and want to add a user then this post is for you. Now if you read this blog usually, you'd be wondering what the heck is wrong with this guy!. I mean first he wrote about finding the Ubuntu version (actually that one is kinda hard to find with the Unity desktop :D) now adding a user, what is he, nuts!. Well here's the thing.

I use Dvorak layout for touch typing and I've been using it for a long time and never thought that I'd write about changing the keyboard layout in Ubuntu because I thought everyone knew it. But in fact after writing a post about it, it did receive a fare share of comments which resembles the importance.

So I thought of writing few posts here and there to help some of the newcomers to GNU/Linux (Ubuntu actually) to get along easily with this totally awesome OS :D.

Well, that should be enough for an explanation to my usual readers (oh way I don't have any :/) anyhow let me get back to the topic. Now as usual there are many ways that you can do this but I'll do it using two ways. I'll skip launching the application using the standard Classic menu in Gnome desktop since Unity desktop doesn't come with that menu.

Method - 1

*. Click on icon next to your current logged in user name in the notification area of Ubuntu desktop (should work in both Gnome and Unity) as in the below screenshot and from the menu, click on: "System Settings".


*. Now from the next window that you get from your left under "groups" choose: "system".


*. Now to your right side choose "Users and Groups".


This should bring you the GUI window which you can use to change/add new or existing users in your Ubuntu distribution as below.


But if you don't like to go through all that hassle, then just open a Terminal window and enter the below command.
users-admin
That should bring you the same window as above.

Now you can add users using this GUI quite easily. Although I wouldn't be going into much details but you can use this to do things like...

*. Add/Delete/Change Users and Groups.

*. Add a phone number/address,etc.

And change user privileges. But except in a Server environment, the most important one in my experience making a user the system administrator of your Ubuntu OS. Now the user account that you create while installing the OS is the default administrator, so most of the time you wouldn't need this.

But say that you have a geek friend or family member :) who likes to do advanced things (yikes) such as configuring a printer, installing applications, etc then he/she will need administrative privileges. In that case, with a freshly created user you can make him one of the system administrator of the system by clicking on the user and then use the "Advanced settings" button.

This should open a window similar to the below one and if you want to make the user one of the administrators of your OS, then click on the "User Privileges" tab and from that locate one that says "administrator the system" (usually the second from the list) and make sure to click on the box to add the check mark.


Also remember, unless you've manually enabled the "root" user in Ubuntu, which is disabled by default for security reasons, then at least one user has to be the system admin. This as mentioned before will be the user that you created while installing the system. So unless you have another admin, you won't be able to remove his administrative privileges.

By using this tab you can enable/disable users from doing things such as ...

*. Using a modem, wireless networks and connecting to internet.

*. Disable network access.

*. Disable CD/DVD drives access.

*. Disable the access to system logs. 

*. Send/receive faxes, etc are just a few to mention.

If you want to temporarily disable a choosen account (rather than deleting), change the home directory path, etc then click on the "advanced" tab and click on the "disable account" option or give the new home directory path. 


If you don't know other things like shell, user ID, etc then its better to leave them to their default values. And Good luck.

How To Check/Find Your Installed Ubuntu Version?

This post is for absolute newbies to GNU/Linux who're about to burst in anger after trying to figure out the current Ubuntu version :). This actually was pretty easy in the past with the Gnome classical desktop, etc but with the introduction of the Unity desktop... it's not that it's hard but I guess that desktop is a bit unfamiliar and so it can be a bit confusing at first.

Anyhow there are many ways that you can find the current version of your Ubuntu OS but I'll do my best to show how to get it by using two or perhaps three ways so someone new to Ubuntu would be able to retrieve that information in the future (hopefully).

The classical way...

Remember, this to work you have to use the Gnome classic desktop and with the upcoming Ubuntu 11.10 it won't be there by default, so in the future, unless you've manually installed Gnome, this option may not be available.

*. Anyhow, if you're ready, after log-in to Gnome, from the main application menu (as in the below screenshot), go to: "System" - "About Ubuntu".


*. After clicking on that, it should bring a new window similar to the one below, the numbers will differ according to your actual Ubuntu version (11.04 in this example).


I've highlighted the text for you to locate easily... 
Universal method (1)

This however I couldn't find in the new Unity desktop. Although by default Unity does not come with a classic menu but even after using the classic menu indicator, I couldn't find it.

But luckily we can still find the current Ubuntu version by using a simple trick. Click on an empty area on your desktop (this works in all desktops - Gnome, KDE, Unity, etc) to make sure the desktop is selected.

Now press the "F2" key on your Keyboard which should bring you the official Ubuntu help page (in your HDD, so no Internet connection is necessary) and as you can see with the below screenshot, you should see the version at the top of the page.


Universal method (2), if all fail ... this should and WILL come to rescue you! :).

Now, GNU/Linux is universal, but unlike any other time, now we have dozens or hundreds of different distributions. Some are "just" derivatives but we do have others that are original or derivatives still have done a lot of customizations of their own thus they're almost original.

After seeing this, the Linux Foundation became concerned that GNU/Linux as a whole and thought in the future it could loose its "identity" easily. So they installed a standardization called LSB which stands for: Linux Standard Base.

This basically ensures that no matter how many customizations that the GNU/Linux system (Kernel, desktop, etc) undergoes under different developers, still some of the basic/core functions (commands and protocols) will be implemented universally. I wouldn't go into details since its really boring (not an expert on the matter either to be honest) as hell and out of the subject as well :).

Anyhow, thanks to this "move" there's a command that'll always exist no matter what changes occur that'll let you find not just the the version of the Ubuntu OS but any GNU/Linux distribution in general, any given time!. So to use that just open your Terminal and enter the below command.

lsb_release -r -i -d -c
Below is my output. As said, if all fail, then this should work for you dudes and dugees in your search for beginning to learn GNU/Linux (oh well, we all are anyway :D, at least I am :/).


The command comes with a simple documentation which you can access by using the below command. Enjoy!.
man lsb_release

How to Make Gnome Desktop Automatically Change the Wallpaper?

Despite all the criticisms against it, still the one of the oldest parts of the GNU, the GTK+ written (now uses the GTK3+ toolkit with the Gnome 3) Gnome is one of the most popular choices among the GNU/Linux users when it comes to the desktop.

The GUI is extremely simplified thus it's pretty easy to learn to use it (especially if you're coming from the Mac OSX environment :D) but as mentioned, most of the time we'll have to depend on "external" applications when it comes to "computing" or doing certain things, since Gnome does lack some features. 

Anyhow, I don't know if we can call this feature a "must have" but nonetheless, if you want to make Gnome automatically change its wallpaper, well, by default you can't.

Although it has a simple desktop customisation window which lets you do things like change the wallpaper, add pictures from online sources (Gnome artwork, etc), change font, etc but it won't let you automatically change the wallpaper on a timely basis.

In that case, especially if you use Ubuntu Linux (the app maybe available for other major distributions) then there is an excellent utility called Cortina that does exactly that!.

Main features...

*. Once installed it'll run from the notification area and let you add wallpaper locations from local storage devices such as HDD/USB, etc easily.


*. Change the wallpaper from a timely basis automatically, finally! :D.

*. Lets you choose it to run when the desktop is loading.

*. Delete pictures from the "collection".

One thing though, once done configuring, don't click on the "close" button at the title-bar, use the big "Close" button below instead, otherwise it'll exit from running thus no more automatic wallpaper changing, etc...

*. Set pictures to - Zoom/scale/centre/spanned, etc

*. Change the time-frame.

That's about it. It's an amazingly simple yet extremely useful app if you want to automatically change those wallpapers nonetheless.

You can install Cortina in Ubuntu 11.04, 10.10 or 10.04 by using its PPA. To do that, open your GNU/Linux terminal and enter the below command.
sudo apt-add-repository ppa:cs-sniffer/cortina

sudo apt-get update

sudo apt-get install cortina
That's it. Once installed you can access it via: "Applications" -> "Graphics" -> "Cortina" in classic Gnome desktop. Enjoy it!.

How to Disable "Feedback" Button in Firefox 5?

Few days ago (yesterday actually :)), Mozilla released the latest version of their award winning, highly secure web browser, Firefox 5. Although in comparison with the version 4, id did not bring any huge improvements concerning the GUI... but because of the bug fixes, performance improvements, etc it is well worth installing nonetheless.

Anyway, by default Mozilla Firefox comes with a button called "Feedback" which shows right next to the "Google search" tab. And as most knows the purpose of this Feedback button is to get user feedback faster thus helping to create an even better, secure web browser.

Also, via this button, you can "participate" in user studies and when a user study is available, it'll give you a big notification message which is quiet annoying. So, how can we disable this "Feedback" button in Firefox 5?.

Firefox without the "button" :)...

Simple, once opened, from the menu choose: "Tools" -> "Addons".

Step 1...

Then from the window that you get, from the left choose: "Extensions" and then to the right side of the screen you'll see an extension called "Feedback 1.1.1" (the version might change according to the updates.

Step 2...

Now all you gotta do is, select that "Feedback 1.1.1" extension and click on the "disable" button. That's it!. Now we've successfully disabled that troublesome Feedback feature. Such a short post, I feel cheap :).

"Multisystem" - Run Multiple GNU/Linux Operating Systems using a Pen Drive!

These days the word Pendrive Linux stands for the process of running a GNU/Linux operating system using a USB stick or a pen drive. Although this is certainly not something new and not specific to GNU/Linux since you can even do this with MS Windows (although Microsoft don't officially support, who cares :D) as well.

This is actually somewhat a "derivative" that comes from the genius idea of the Live CD which lets users run a pre-installed OS using a bootable CD/DVD without having to install it on a HDD. Although CD and DVD's are not dead :) but other than storing movies and backing up data, most prefer to use the USB drives these days.

They're pretty small, easy to carry, re-writeable, quiet and much faster than CDs. So, by using a USB or pen drive to run GNU/Linux OS rather than using the conventional CD will give us the ability to experience the OS in general, in much faster way. Although haven't yet come out that much... but with the introduction of the USB 3.0, oh man.... they're dauntingly fast!.

Anyhow, the problem is that, unlike creating a boo-table Live CD using a disk image which is pretty easy since all the CD/DVD burners support this by default, yet when it comes to creating a bootable Live USB GNU/Linux "disk" is a bit hard.

Although you can do this by using the Linux command line but again, it ain't that user friendly.

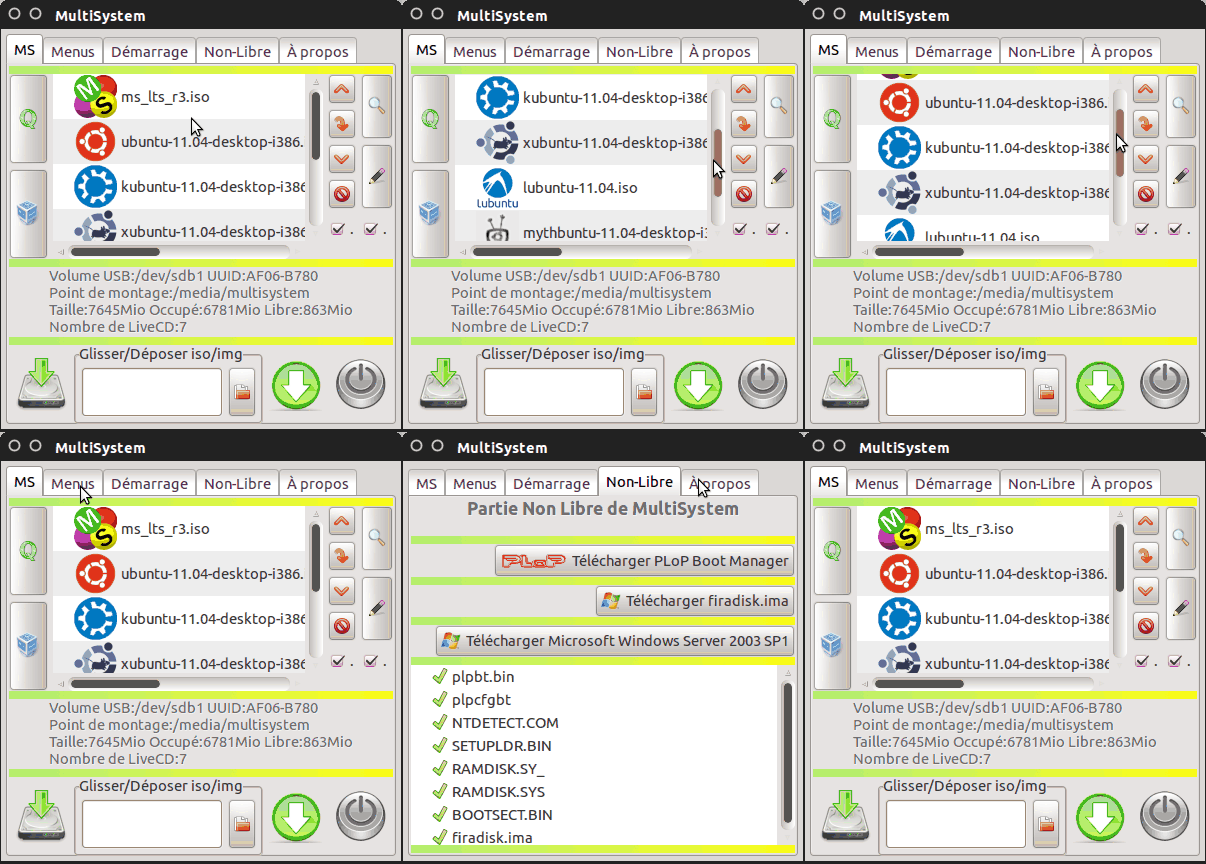
Even if you do it manually using the command line but it can't let us create a "pendrive Linux" which contains more than one OS. Well, you'll be glad to know that there is an excellent utility called "Multisystem" which does exactly that!.

It's a GUI written in GTK+ toolkit and once installed you can use it to ...

*. Install more than one GNU/Linux distribution into a USB drive and create a multiboot Live USB drive!.


*. Supports a huge list of distributions by default.

*. Drag-n-Drop support.

*. Also supports removable hard drives, Memory cards, SSD drives as well.

*. If you have installed Virtualbox, then Multisystem even lets you run it via the Virtual environment.

The default Grub menu...

*. USB stick has to be formated using the FAT32 file system.

That's about it actually. Once you show the app where the .iso files are, it'll extract them (can use more than one OS as said before) to the pendrive or any supported storage media and then it'll automatically install the proper boot-images + the Grub boot-loader as well.

If you use Ubuntu 11.04 Natty Narwhal, then you can install Multisystem by entering the below command in your command line (Terminal).
sudo apt-add-repository 'deb http://liveusb.info/multisystem/depot all main'

wget -q http://liveusb.info/multisystem/depot/multisystem.asc -O- | sudo apt-key add -

sudo apt-get update

sudo apt-get install multisystem
I actually can't give you a screenshot of mine because it needs you to have an empty USB drive... I don't have much space to put the "data" inside mine.

This was as far as I could "go" because of the "not empty" USB stick :/...

Anyhow, if you want to test a multiboot or singe boot Pendrive Linux "environment", then I highly suggest Multisystem, this is one hell of an application!.

Install FAAC in Ubuntu 11.04 - AAC Audio Encoder for GNU/Linux

AAC is a very popular audio compression format (codec) that was developed/funded by several famous companies such as Nokia, Dolby, Sony and Bell Laboratories (few to mention). That information alone should be enough to give you the impression that AAC is not an open-source codec ;-), although some portions of the project is licensed under GNU/GPL, nonetheless.

But the rest assured, it's efficient and especially under low bitrates, AAC codec will give much better quality outputs when comparing with the MP3 format. It is actually widely used by Apple (in almost all of their products such as iPhone, iPod-touch, etc) and various other electronic manufacturers all around the world. 

Unlike with MS Windows or Mac OSX, it's actually really hard trying to find a decent AAC encoder for GNU/Linux. Don't get your hopes up so high, because after doing some search, I've only come up with a command line tool :/. If you know any better utility, I'll be more than happy to hear about it.


It's called "FAAC". And with it you can only use WAV and Raw PCM files to convert into the proprietary AAC lossy audio format.

And on the other hand, encoding a MP3 file to AAC for instance, is pretty much useless since it actually "defeat" the purpose because, MP3 is a lossy format thus valuable "information" is already lost once you convert something into MP3, so you won't be able to get the desired results by re-converting them into the AAC nonetheless.

But there are applications that can convert MP3 to AAC, anyhow.

First install FAAC in Ubuntu 11.04 Natty Narwhal by using the below command.
sudo apt-get install faac
A Simple FAAC guide :).

You can read its manual, which explains almost everything by using the below command.
man faac
But for a quick wrap up :) let me give a basic example. Say that you have a .wav file called "1" in your Home folder that I need to convert into AAC format. Then I'd use a command similar to below one.
faac -b 96 1.wav -o new.m4a

The "-b" attribute defines the desired audio bitrate, so depending on your needs you can replace it with values within the range of - 12 kbps to 600kbps. The "-o" defines the output file, so you can replace the "new" with any name you like but make sure to use ".m4a" or ".mp4" as the extension.

You can use multiple attributes as well.

Say that you wanted to change the audio channels (default - 2, stereo) to 5 and the sample rate to 22100, which are among the main needs when it comes to encoding audio in general other than the above mentioned bitrate, then I'd use a command as below.

An example...

faac -b 96 -C 4 -R 22100 1.wav -o new.m4a
As you can see, the "-C" is used to change the desired audio channels (which is 4 in this example), "-R" is used to change the sample rate (in Hz), I've already talked about the "b"... :D. So that's about it actually. And if you have questions, then as mentioned above, I highly advice you to read the manual, that's where I got all those "tips" ;-).

Although this cannot be recommended for batch audio to AAC encoding since it won't be easy to put command after command for multiple files... but for everyday use, this is pretty handy nonetheless. Good luck.