Pages

Showing posts with label utilities. Show all posts

How to Manage Mounted/Unmounted File Systems Easily in Ubuntu?

I remember in the past how hard it was with GNU/Linux while trying to mount and un-mounting file systems (especially proprietary ones such as Fat32 and NTFS). The more experienced geeks ;-) like to use the command-line for that since all those disk mounting utilities are installed by default into the OS thus you don't have to manually install a GUI.

But, even if you're a bit "advanced" still by having a GUI tool that uses those command-line utilities makes the whole process a hell lot easier. Although these days GNU/Linux is so good that it just automatically mounts USB devices with ease but still if you're having some troubles with USB pendrive which arrogantly refuses to be mounted + needs to a little tweaking here and there (yikes!), then a utility like "MountManger" can come quite handy.


Main features...

*. As said, this uses the already built in command-line tools thus comes with a huge list of options/features.

A powerful "little" companion ;-)...
*. Supports the following file systems: ext4/3/2, ntfs, swap, fat, reiserfs, iso9660, udf, etc).

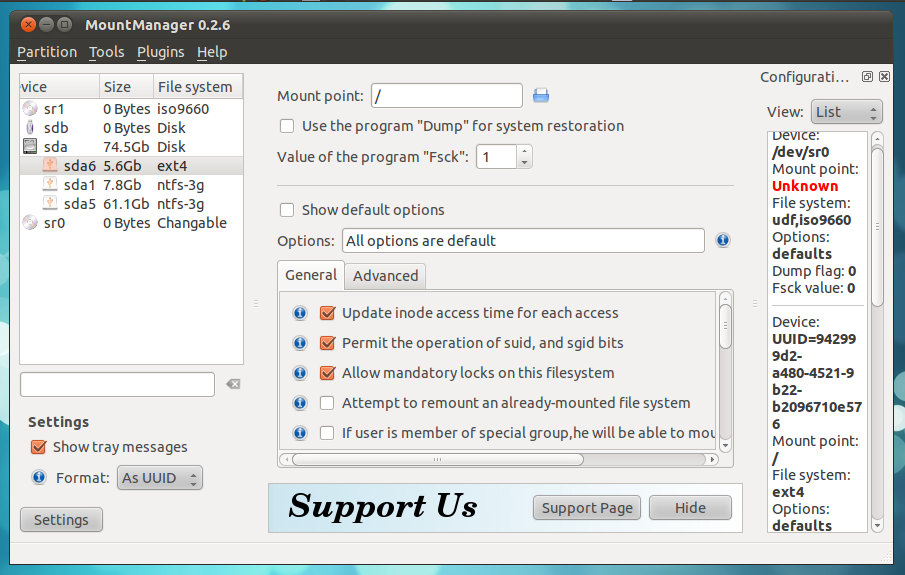
*. Mount and Unmount.

*. Change mount points. 

*. Change mounting privileges of the users.


*. Manually set the supported file systems checked through Fsck utility ("0" means no check and 1 means manual scan for errors).

*. Enable/Disable mounted devices link (shortcut) creation, execute binaries, etc.

*. Specify encryption algorithms.

*. Change Umask, read/write features and a lot other advanced options.


*. Change file name encodings.

*. Heck, it can even mount disk images too! (ISO, NRG, MDF, BIN, etc).


*. As mentioned before, includes a USB mounting wizard that lets you easily mount any troublesome USB devices... are just fraction of its features to mention.

You can install MountManager in Ubuntu 11.04 Natty Narwhal, 11.10, 10.10 and 10.04 by using the below command in your Terminal window.
sudo apt-get install mountmanager


But please be very careful while accessing some of the advanced file system related settings and if you don't know what you're doing (to be honest, I don't even understand half of the options in it! :/), then please don't change anything.  Although it does let you restore easily to the original settings, but still, think twice before stepping into the "unknown" ;-).


But other than that, if you want to do things like enable/disable read-write permissions or change mount points or even mounting disk image files which are considered as "usual needs" for GNU/Linux users these days, then yes, I do find Mount-Manager to be an extremely useful and powerful little utility (even though Ubuntu come with one but it lack the features of M-M) nonetheless.

Use it with caution!, and good luck.

Multitrack Audio Editor/Recorder for Ubuntu: GNUSound

If you have a lot of multitrack audio files that need a little editing and looking for a software application that lets you do it without getting in your way, then GNUSound is an excellent little utility.

Although we do have the more popular Audacity which is a very powerful audio recorder and editor itself, but if you're looking something similar in natures + comes recommended by the GNU dudes themselves ;-), then GNUSound is also a very competitive one without a doubt as well.

Main features...

*. Has the ability to load and edit audio file types such MP3, WAV, OGG Vorbis, FLAC, AAC etc. But unless you have installed Lame MP3 encoder for instance, then you won't be able to load and edit MP3 files using it.


So if you want the maximum usability out of it, then make sure you have installed appropriate audio package separately. You can get more info from here.

*. Cut/Copy/Delete/Paste using the time-line window section with ease.

*. You can even import audio track inside a lot other multimedia containers using the ffmpeg libraries installed as well.

*. Amplify, Bandpass, delay, fade, normalize, reverse playback, etc are just a few of the built in tools.


*. Play and Record audios.

*. Zoom in/out.

*. Lots of selection based features such as: left, right, nudge left/right, snap to grid, etc.

*. Playback and Record supported via Alsa, OSS, Jack or Dummy audio servers.

*. Change sample rate 8/16/32, audio channels, bitrate, recording buffer size, etc via the "Preferences" window.


*. Insert or delete individual tracks.

*. Save audio track in different formats and error recovery (say to due to the application crash, etc)... are the main features to mention.

You can install GNUSound in Ubuntu 11.04 Natty Narwhal, 11.10, 10.10 and 10.04 by using the below command in your Terminal window.
sudo apt-get install gnusound
It did crash once I was using it but other than that it was certainly quite robust and was resource friendly too.

So if you're looking for an easy to use, fast loading multitrack audio editor and a recorder for Ubuntu (it's designed for the Gnome desktop actually) that comes recommended by the GNU foundation, then GNUSound is certainly a simple yet a powerful utility which is also completely free! (including free as in freedom too :D).

How to Convert Word Documents to PDF & HTML in Ubuntu?

When it comes to OpenSource office productivity suits the current dominator is the LibreOffice (which was "used to be": OpenOffice = so long friend :/). And as with other major office suits, you can also use both LibreOffice and OpenOffice to save (convert) your documents to other formats as well.

But say that you have a simple text or any other document file in Ubuntu, then if you want to create a PDF file out of that, then you have to first open LibreOffice which is gonna take few seconds and then you open it and click on the menu and choose "Save As", seriously, it ain't fun and time consuming if you do that sort of things, a lot I meant :D.

But luckily, a sensible little programmer has come up with an excellent little script called Batch Convert Documents that uses either LibreOffice or OpenOffice built in tools which lets us convert any word document (that's supported by those office suits) to PDF or HTML format as easy as right clicking on the sucker!.


Main features...

*. Supports both PDF and HTML conversations.

*. Not just the GTK+/Gnome version but also has a separate script for Qt/KDE geeks too.

*. A simple progress bar.


*. Automatic notify via the system notify protocol (both successful conversations and errors).

"I'm done!, I'm done!, I'm done!" ... errr you "notifications!" ;-)...
Well, that's about it for features. The installation is quite simple.

Although I only tested it in Ubuntu 11.04 Natty Narwhal, but as long as you're able to install its dependencies (don't panic!, more below :P) I think it should work in 10.10, 10.04 and even in 11.10 as well.


Installation...

As said, it has three dependencies which Ubuntu does not ship by default.

1. So before installing the Nautilus Script, let's install the dependencies. For that use the below command in your Terminal window.
sudo apt-get install unoconv xclip libnotify-bin
2. Now download the script from here and extract its contents (say, to your "Home" folder for instance).

Now open your terminal and change your directory to that extracted folder ("batch-convert-documents-0.2-2" for the current version) and enter the below command.
sudo install -m 755 batch-convert-documents /usr/bin/

3. Now to finish up, use the below commands.
cd nautilus-scripts

cp -r Convert\ documents ~/.gnome2/nautilus-scripts

OR if you use the graphical version, just make sure Nautilus shows hidden files and then copy the content of the "Convert documents" (inside of the sub-folder of the extract directory) to "~/.gnome2/nautilus-scripts" , manually.

I tested this script to convert ".doc" (older version of Microsoft word document format), ".odt" and a simple Text file to both PDF and HTML and they all worked without any errors!. Good luck.

Best Network Bandwidth Monitor for Windows: Networx

I have an internet connection that has a monthly usage limit "attached" to it (errrrrrr). So whenever I browse the web, I used to log-into my ISP account and check for my daily/hourly data usage, which wasn't the most enjoyable thing in the world, to mention ;-).

Although both Windows Vista and 7 do come with an advanced system monitor their own yet most of the time they've failed to meet the requirements of "simple PC users" (like you and me ;-)). For instance, the built in utility of MS Windows fails to give me details such as monthly or daily data usage of my traffic, it cannot perform a speed test or it won't let you save your current bandwidth data to disk, etc either.

So in that sense, if you're looking for a simple, free but one of the best tools that display up-to-date information about your current network traffic/data usage, then Networx is a very impressive one without a doubt.

I'm not a network administrator but it also come with few additional features that can be quite useful to 'advanced dudes" like network administrators as well (more on that later).


This dedicated network bandwidth monitoring software comes with a very simple yet powerful GUI and lets you do things like...

*. Four built in bandwidth reports: Daily, Weekly, Monthly and Hourly.

*. "At a Glance": This is a nice little feature that lets you see a basic usage of daily, weekly and monthly within a single window.

*. Set Quota setting: By using this feature, you can easily set Networx to automatically notify your when you reach your daily usage limits (that are manually defined of course) or you can set up it to display a warning when you've reached a certain percentage of your daily/weekly/monthly data usage as well (pretty advanced stuff huh :P).


*. Dial-up Session: If you don't have a router that's always connected to the internet and uses a USB dongle instead, then you'd love this feature. This will display your data usage for your each session.

*. Custom: If all those daily/weekly/monthly, etc is not enough for your taste ;-) then you can manually define a time-frame and can view your date-usage by using the "Custom" section.

*. Multi user support.

*. A built in network speed meter.


*. Import/Export:


This is my favorite feature and the reason is simple. I use both MS Windows 7 and Ubuntu Linux in the same computer + uses the same internet connection. Now, Networx does not work in Ubuntu but since I do a lot of downloading (so I could write reviews for you geeks daily, lol) but as soon as I boot into MS Windows that data usage is not included in Networx (obviously).

So all I do is just remember the network usage in Ubuntu (using its system monitor) and then convert that amount into Kilobytes (using the calculator in Windows) and then I use the previously exported data usage of Networx in XML format and update the data-usage (manually) and restore the new updated XML settings file and Networx now displays the previously "missed" data usage under Ubuntu!. So it's really handy for someone like me :).

Although not super important, but you can access a lot of its options via the "Settings" section by using which you can change the Window opacity, make it display a very small graphs in your notification area, change graph colors, set what happens when you move your mouse over the Networx icon, etc are just a few to mention.


Networx has the ability to deal with simultaneous network connections + you can set it to ignore your LAN bandwidth monitoring as well. From visual alerts to shutting down the computer after a certain bandwidth limit is reach, disconnect your network connections and setting a master password ... it is certainly quite powerful.

Although most of the users may not use these features but Networx  has  few advanced features such as Ping and Trace Route, etc which can come quite handy for network administrators ...
Anyhow, if you have those above mentioned needs and looking for a dedicated network bandwidth monitor for which you don't have to pay any money whatsoever (it's completely free, no ads no spyware!) but can cope with the fact that it only works with MS Windows, then Networx is certainly an excellent utility without a doubt.

If you want to give it a try, then please visit this Networx home page for downloading or getting additional information. Good luck.

How to Edit the Contents of an ISO Disk Image in Ubuntu?

As many knows already, you don't need any other application other than an archive manager if all you want is to view the contents (+ even changing the contents) of an ISO disk image file. But if you want more than that, such as mounting the content or changing it without loosing the boot-able core files (if any) then you will have to use a dedicate tool nonetheless.

And when concerning the contents of an ISO file that holds an operating system for instance then yes, you can still use an archive manager to add/delete files from it ... but if you do so, them most of the time after doing your changes, you'll have an un-bootable ISO disk image.

The reason is simple. An archive manager is simply an archive manager thus (most of the time) it won't be able to edit the content without destroying the "Boot Record" portion that includes all the information needed for making it boot-able.

In that case, if you happened to use Ubuntu ;-), then there's an excellent Utility called "ISO Master" that lets you do exactly that.

Welcome to the master of the "ISO", kiyahooooooooooooo! ;)
Main features...

*. Add/Edit/Rename and delete the contents of an ISO file.

*. Only supports the ISO disk image extension (although you can read other extensions such as NRG and MDF, more later).


*. Has the ability to view certain types of files such as HTML and Text related ones.

*. Extract the contents (since a disk image is a sort of an archive). 

*. Save/Delete or manually change the Boot-record according to your own preferences... are it's main features.


You can install IsoMaster in Ubuntu 11.04 Natty Narwhal, 11.10, 10.10 and 10.04 by using the below command in your Terminal window.
sudo apt-get install isomaster
Remember if you want to view some of the contents of the disk image file, say a configuration file or a Text file for instance. Then if you use a desktop other than Xfce, then make sure to go to its "Options" window and change the "viewer" command to "gedit" if you use Gnome classic desktop or with whatever your preferred editors name.

By default it uses the Editor "mousepad" (Xfce's text editor). But I replaced with my own...

Another thing, ISO Master also supports reading ISO, NRG and MDF files as well. But it can only save files the .iso format only.

Anyhow, if you want to create a bootable ISO disk image (CD/DVD, etc) file using files in your HDD from scratch or modify the content of an existing disk image (without destroying its core-properties such as above mentioned boot-entries) then ISO Master is certainly one of the best without a doubt. It's also free and even supports MS Windows too (Windows version is not free though :/).

Need a Free Secure Password Generator? Use Wolfram|Alpha!

I'm pretty sure most of you know about Wolfram|Alpha but for the those of you who don't, then it's an engine of knowledge. I know, now it sounds more confusing. So let me give you an example. Wolfram|Alpha is sort of a search engine, but it's rather more advanced and complicated one.

For instance if you type the word "secure password generator" in Google, then what Google basically does is, it tries to find an answer based on its "index" and match your query and tries to give you the best matching websites (based on various factors) that perhaps hold the answers to your question. So in a way, traditional search engines like Google, Bing, etc basically have a limitation. They can only point you towards the answer but cannot directly put together a one by themselves.

But if you search for the same term in Wolfram|Alpha, it won't necessarily point your towards some kind of a software product or a website, but it'll give you an online software (kinda) created by itself, using which you can create a secure password for free!.

The most special "Wolf..." ;-)...
How is that possible?

It's quite simple actually (although the real process is much more complicated). It was possible because, just like a traditional search engine, Wolfram|Alpha index web pages, it match your queries, etc but unlike other search engines, it goes further by reading all those information on the index and then trying to create a solution of its own!.

So as with this instance, it may have read all those information needed to create a powerful password using web source like Wikipedia (yikes!), etc and then like a human being (although it's far far away from "us") by based on the information that it had gathered, it'll create a secure password generator software of its own.

So in that sense, traditional search engines are like library index keepers who can only point your towards the books by using which you'll have to find the answer all by yourself. But Wolfram|Alpha is sort of like a professor whom when asked a question, he won't necessarily point you towards a book (out of pride, kidding! :P) but thanks to the knowledge that he already have, he'll give the direct answer to your question (I tried my best dudes).

Back to the topic... 

Anyhow, did you know that by using this amazing knowledge power house, we can easily create a very powerful password online for free. Steps are pretty simple.

1. Search for a phrase like creating a strong password in Wolfram|Alpha first (or anything that implies the same thing).


2. This should open up a window similar to the below one. Now this is sort of an online password generating utility. So you can change additional settings like: password length, enable/disable numbers, upper/lower case letters, special characters, etc.


Wolfram|Alpha will even give you additional things like how long would it takes for an average computer to break the password, what Hash algorithms it used and "hints' that you can use to remember it, etc.


To be honest, I don't whether this is one of the best tools out there (remember, it also uses powerful Hash algorithms.. so it's really powerful) but for most of us if you don't want to buy a premium utility or don't wanna install a free software on your PC, etc and need something that'll always be accessible online for free, then heck, Wolfram|Alpha is certainly pretty handy. What do you think?

Advanced File Copy Utility for Windows: TeraCopy

By default "Explorer" is the one behind all your file management (including managing the desktop, etc) in MS Windows operating system. Over the years it has evolved really well thus in comparing with the Windows 98-XP explorer, now we have a pretty simplified, efficient and robust file management utility for the MS Windows "lovers" ;-).

Anyhow, concerning the file copying starting with Windows Vista, Microsoft added few enhancements to the file copying dialog such as showing the current transfer speed for instance (not the most useful features of all but). Still if you usually deal with a lot of file  copy/move activities daily then wouldn't it be nice if you could find a dedicated utility that gives you a lot of control-ability under those situations?.

For instance, lets say that you were moving a folder with thousands of image files within the same HDD and at the middle of this "activity" realized that you wanted something urgent (say, to open the web-browser and log-into Facebok, kidding) that would take reasonable amount of disk activity, then you either have to wait till Windows moves the files Or if you have to cancel it!.

But what if we could just "Pause" the file move temporarily and "Resume" it later!. So if you have those kind of special needs (you never know when you're gonna need one), in that sense, if you want an excellent, free utility (although they do have a paid version too), then I came across this one called TeraCopy few years ago and have been using it a lot lately, because it's awesome! :D.


Main features...

*. Copy/Move/Delete files.

*. Integrates into the Windows Explorer and "registers" it self as the default file copy/move handler.

*. Add files to a list: It's like a playlist. You can add any amount of files into the list and then later copy/move them all at once where with Windows you'll have to manually copy->paste each one (although most of the time you'll have to wait till one of few process are close otherwise it'll slow down the computer) ... but now you can just drag-n-drop into the TeraCopy window while it's busy copying others!.


*. Verify: Check for the integrity of your  file by using their CRC (cyclic redundancy check, a file-integrity error handling method).


*. Shutdown: You can tell TeraCopy to automatically shutdown your PC after the file copying is over.

*. When set, it can also automatically un-mount/eject drives.

*. Skip copying files in the list (only for the paid version).

*. Enhanced error handling: If you have a file that's unreadable, then before giving up TeraCopy will try for few times + even if it fails to copy it it won't terminate the whole process thus continue with others as nothing happened :D.

*. Pause and Resume (as explained above, you can simply interrupt the copy/move activities any time you want and resume them later!).


These are just few of the main features. Another thing, when you copy or move a file in MS Windows, if the file didn't copy 100% (say an error occurred) then Windows will automatically delete the file. But TerCopy will make sure to keep the portion of the file.

Now this may not be always be helpful, but it can be pretty handy sometimes. Say that you copied a movie almost to its end (98%) but an error occurred towards the very end of the file, still by using TeraCopy, not only it'll keep that file but we should be able to watch it afterward (means the almost full movie since towards the end there's nothing but the boring "credits" ;-).

Anyhow, if interested, you can get it from TeraCopy home page and if you want few additional features, then you can get the full paid version as well. But for most of us, the free version is more than enough.

Excellent Disk Defragmenter for Windows: Defraggler

As almost everyone knows, disk fragmentation can be one of the mains reasons behind slowing down your operating system. There are many reasons of course, such as frequent software installations, immovable files or using a singe HUGE partition instead of a few, etc. Anyhow, as times goes on you "will" have to manually defrag the entire HDD.

I'm pretty sure there are many others, but if you've been searching for one of the best yet completely free HDD defrag utility for Microsoft Windows XP, Vista and 7 then Defraggler is one little app that's worth giving a try. It's true that MS Windows does come with one of her own (built into the OS) but there are both commercial and free dedicated utilities that lets you configure a lot of other options that the built-in Windows doesn't offer.

Let's have a look at some of the features of Defraggler


*. Defraggler lets you de-frag the entire HDD, partition or individual folders/files (something that MS Windows tool lacks).

*. Add Or remove files: this is again very useful since say that you have a folder filled with video files that are only there temporarily, then even if the content is fragmented, yet you can manually remove it from the list thus save some time.


*. Very user friendly window (including using colorized methods for indicating the fragmentation levels).

*. Boot-time Defrag support: If you want to achieve the best results concerning the MS Windows system partition, then this is the best method since Defraggler can move some of the locked system files, etc.


*. Change priority: You can either run it using lot of your HDD bandwidth or can defrag the HDD without slowing down it too much thus you can do something while doing it.

*. Free space defragmentation.

*. Check disk for errors.

*.  Search and find files.


*. Quick defrag: This'll do a fast defragmentation (for the impatient geeks :D) but won't give the best possible results though.

 *. Schedule support.

There are among the main features to mention. As said, this is only for MS Windows. If interested, you can download it from this Defraggler home page. As said, in my experience, this is one of the best HDD defrag utility that's also completely free!. Enjoy.

Comprehensive Disk Cleaner (file system) for Ubuntu: FSlint

When comparing with the proprietary MS Windows file systems, the GNU/Linux file systems have their advantages and disadvantages. For instance, according to the experts, GNU/Linux ones, they don't need to be de-fragmented from time to time as with MS Windows, etc ... but I do feel that still, MS FS are better at loading folders filled with thousands of files or concerning the overall performance (at least in my experience).

But the point is, apart from all these differences, there are few things that are common to almost all the file systems thus you may need to manually configure and "fix" some of those issues (not always necessary though) which not only helps to keep a "healthy" file system but it also helps to free some disk space as well.

In that sense, if you've been searching for a dedicated utility that lets you manually search and find duplicate entries, broken links, empty folders, etc... from a singe GUI (+ an optional command-line interface too), then FSlint is an excellent little utility.

Main features...

*. Find and remove duplicate files/folders.

*. Search for Bad File names (doesn't mean they're corrupted or anything, but you know those naughty file names with non-standard UTF characters/names, etc).

*. Name clashes: find conflicting file/folder names.

*. Temporary files.

*. Bad symbolinks (invalid shortcuts).

*. Find files with missing user IDs.

*. Find empty folders.

*. Non stripped binaries & Redundant white-spaces (not entirely sure that the do to be honest).

You can install FSlint in Ubuntu 11.04 Natty Narwhal, 11.10, 10.10 and 10.04 by using the below command in your Terminal window.
sudo apt-get install fslint
But FSlint also has another very useful feature that shows installed packages and their HDD spaces thus you can even remove them/un-install directly using FSlint and it'll even calculate the dependencies and properly remove them. 

My personally favorite feature...
You can also add/exclude paths. But if you want the maximum controllability then you'll have to run it as the root user but be careful and if you don't know what you're doing, then don't search for duplicate files in the OS core locations for instance (although some folder location are automatically excluded) since it can easily break your entire OS.

Also be careful while searching and removing (even inside your Home folder) duplicate files for instance, if you search within your "Home" folder, some of those ".xml" files may have the same name but they would most probably in different locations thus removing them is not a good thing to do.

But other than that, searching for duplicate files within your manually created folders, etc in Ubuntu (also supports few other distributions), FSlint is an excellent utility. But again, please use it with caution.

Boot-Repair-tool for Ubuntu is Updated with Lots of New Features!

Boot-Repair is a bloody excellent little utility that lets you recover your boot-loader configuration (GRUB actually) related settings which seems to be pretty common with MS Windows 7 and Ubuntu users since when you do updates in MS Windows and if the OS core files are updated, then sometimes Windows just update/over-write (errrr :D) MBR thus breaking GRUB boot-loader files, completely or partially.

Although when it was released few months ago some of the advanced options were not shown to the Ubuntu users but I don't know when it happened, but the author has released a new version/updated of Boot-Repair which brings a lot of very useful, advanced features such as ...

*. A simple welcome screen from which now we can choose either:


1. "Recommended Repair": If you choose this option, then you don't have to do anything the Boot-Repair will take care everything for you.

From checking the partition to removing your current installed/broken GRUB to re-installing it... everything is automatic (few minutes ago I successfully reinstalled my GRUB and everything went really well, hey I'm still here!).

2. "Create a Bootinfo Summery": This is another very useful feature. For instance, say that you have a partially installed GRUB, wait!, what the heck does that mean!?

Well lets just say that you have a GRUB menu without anything but a blank screen .... and you went to an online community of Ubuntu experts and the geeks out there asked you whether you could give them a "log-file" related to your current GRUB settings or something similar.

Then you can use this second option that will create a full summary about your GRUB boot-loader and in my case it took like 40-50 seconds. Boot-Repair even uploaded that log-file in the Ubuntu Paste-Bin service which makes sharing it a breeze!.

But if you want additional controllability, then simply click on the "Advanced" button which will let you do things like...


*. Reinstall the GRUB (with or without replacing MBR).

*. Show/Hide the boot-menu after few seconds (that you can define manually).

*. Repair File Systems.

*. Install the GRUB loader into a different location (other than your MBR which is the default location) such as on the Ubuntu 11.04 partition, USB drives, etc.

Don't worry if you don't see your MS Widows 7 or Vista here since it only shows the OS that you're currently running...
*. Add additional initial boot-functions such as ACPI on/off, disable APIC, ATI Readon GPU related settings, etc.

Watch out for Pride! :P...
*. Enable/disable ATA disk support.

*. Restore the original MBR (the one that came with MS Windows which was there before you install Ubuntu). This however will only be available if it's not deleted by the Ubuntu OS installer.

*. Manually edit the GRUB file using a text editor (ahh, the good-old-days :D).

You can install Boot Repair in Ubuntu 11.04 Natty Narwhal, 11.10 Oneiric Ocelot, 10.10 and 10.04 by using the below three command in your Terminal window.
sudo add-apt-repository ppa:yannubuntu/boot-repair

sudo apt-get update

sudo apt-get install boot-repair
After installing, you can run it by pressing "Alt" + "F2" keys and entering the below command.
boot-repair
Remember, I think before going into the advanced section, you should try the Recommended option that'll solve many known GRUB boot related problems with Ubuntu 11.04 and MS Windows 7/Vista, etc.

And lastly, please don't try to enable advanced Kernel settings (above mentioned ACPI, etc) unless you know what you're doing.

Update: You can also visit this new official Boot-Repair Ubuntu Wiki-page for more (thanks Yann for the update!).

Best Optical Disk Image Mounter for Ubuntu: FuriusISOMount!

Making Optical disk image backups is a great way to backup your data (which can really fasten up the process, depending on the content type, etc as well). Although we can view the content of the disk image even without a dedicated mounting software as long as we have a decent archive manager installed but "virtually" mounting the optical disk image is the best way to view the content.

Now, few days ago I did write about an ISO image mounter for Ubuntu, which is really good actually. But it had an apparent disadvantage, that is, it only supports ISO images. But what if you had another type of disk image, say the proprietary Nero images (NRG)?, how can you mount them in Ubuntu?.

The answer is simple, just install this other, aWeSomE disk image mounter called Furius-ISO-Mount and the rest should be taken care of!.

Main features...

*. Supports multiple optical disk image types such as: ISO, IMG, BIN, MDF and NRG.

*. Mount as a FUSE (it's like a virtual file system within the main FS that lets users to "create"/mount virtual file systems without admin privileges) or Loop device.    

*. Image checksum support (MD5 & SH1 algorithms supported): Heck, this tool even lets you check for errors.

*. Burn your disk images to actual optical disks (using either Brasero or Nautilus).

*. Drag-n-Drop support.

*. And unmount. 

You can install furius-iso-mount in Ubuntu 11.04 Natty Narwhal, 11.10, 10.10 and 10.04 by using the below command in your Terminal window.
sudo apt-get install furiusisomount
Now, whenever you want to mount more than a singe optical disk image type that you backup earlier in Ubuntu, just launch "Furius" and mount the hell out of it! :D. 

A File Type Editor for Ubuntu: assoGiate

assoGiate is actually a file type editor for the Gnome desktop but since the Ubuntu Unity desktop still uses a lot of Gnome technologies (especially Nautilus as the file management utility), we can use it under Ubuntu for editing/adding new file types with ease nonetheless.

Anyhow, every time you install a new application (say in Gnome desktop) and if that newly installed utility comes with a file types of its own which is not presented in the OS, then it manually registers those file types thus these applications are rarely needed for the newbies But...

... assoGiate is intended for the system administrators who want to manually change the configuration of the file types in Gnome/Ubuntu (or in any GNU/Linux distribution that uses Gnome), but of course dudes (ladies included :D) like you and me also can use it to play around the system settings (yikes!) a little bit as well.


Main features...

*. Search for the default file-types.

*. Edit the already consisting ones.

*. Add a New file type with Categories, related types, file names (also known as "extensions"), XML elements and other advanced options such as changing priority values, etc are also included.


*. Switch between User and System database (system database is only "shown" if you run it with administrative privileges).

*. Remove existing types (only available in the administrative mode).

*. Import/export the database... are the main features to mention.

You can install assoGiate in Ubuntu 11.04 Natty Narwhal, 10.10 and 10.04 by using the below command.
sudo apt-get install assogiate
That's it, be safe ;-).

Advanced Multi Touch Gesture Recognizer for Ubuntu: Touchégg

It was Apple who "invented" the idea (after they bought the company that really invented it) of Multi touch Gesture Recognizing feature first. Although it was first came out with the iPhone's touchscreen based, but later they integrated it to the Trackpads of their Laptops or Ultrabooks such as Mac Book Air which received a lot of positive feedback from users.

Anyhow, the Multi Touch gestures can be implemented on Trackpads or any similar devices by using main two methods.

1. Embedding it into the BIOS of the Trackpad: This I think is the best methods since we don't have to install any software to enabled the multi-gestures thus it's software/platform independent, somewhat (since the BIOS coded software should be familiar with the OS when it comes to resizing, zooming, etc. But there's is a standard for Multi-gestures thus Max OSX, Ubuntu 10.10 and after and MS Windows fully support it by default) + these hardware integrated devices tend to performs better than the software based ones.

2. Using a dedicated software: This is the only hope for us with a never Trackpads/touchscreens that support this feature but want more control over its functions, etc.

Anyhow if you use Ubuntu Linux and looking for a utility which enables you to do all those nerdy gesture stuff with more advanced features..., then Touchégg is something that's worth looking into.

Main features...


*. Manually add/define a huge list touch-gesture related functions such as: Maximizing, minimizing, show the desktop, horizontal/vertical scrolling, launch the execute a command window, close a window, hove a window, resize a window, etc.


*. Supports up to 5 fingers!. So nothing is wasted :D.

*. Tap and Pinch support. 

*. Works with a lot of window managers such as Compiz, KWin, Metacity, etc.

*. Manually change the "Tap & Hold" time sensitivity.


That's basically about it when it comes to features. 

Touchégg is actually a "portion" of a bigger project called egg Window manager (that supports multi-questers by default). You can install Touchégg in Ubuntu 11.04 Natty Narwhal, 10.10 and 10.04 by first downloading the ".deb" packages from this download page.

But no matter what Ubuntu version that you use, you gotta install two separate files that include both the command-line core files + the GUI window. For instance, if you use 11.04 Natty, then

1. Get the command-line, "engine" from here first.

2. After the installation (just double click on the downloaded file and follow the on screen details), download the GUI from here and install it too.

After you've installed the both of the packages press "Alt" + "F2" keys on your keyboard and put the below command into the window and then you should be greeted with the configuration window by using which you can setup the multi-touch gestures for both the Trackpad or the touch-sensitive screen, etc with ease in Ubuntu!.
touchegg-gui
But remember, as said before, some older trackpads do not support the multi gesture recognition thus (as with my case) even if you install this, you won't be able to use the functions.

So in short, this application is only for those of you geeks, who already have a multi-gesture supported device but just lacks a dedicated software (one that gives you better control over actually, since Ubuntu does support it by default as far as I know) to do that for you under Ubuntu (or GNU/Linux in general)!.  

Best Note Taking Software for Ubuntu Linux: Xournal!

When it comes to taking notes under Ubuntu (or GNU/Linux in general) both Qt/KDE and the Gnome desktops come with built in applications of their own. For instance, Gnome desktop has a very simple, yet elegant note taking application called Tomboy, recently they even introduced a version for the Android users too!.

But if you're looking for a really (I mean really!) powerful, one of the best note taking open-source software that can be used in Ubuntu, then Xournal is one heck of an app!. 

I mean, to begin with, Xournal looks like an actual note-book. It actually reminded of my childhood thus I felt really familiar and got a felling of secureness straightaway (not kidding dudes!). As said this is a very powerful, dedicated note taking application thus comes with a huge list of very useful,


features such as ...

*. Awesome tool-bar with tools like: Text, eraser, pen, highlighter!, vertical space and rectangle select tool, etc.

*. Change color, font, size, etc.

*. Change "pen/eraser" thickness.

*. A Ruler and a hand-tool.

*. Enhanced support for touch-screen users.

*. Change paper size and four built themes/templates.


*. Add/Edit pages (after or before your current page).

*. It even has the ability to view PDF files and you can save your notes in PDF format too.

*. Edit individual layers.

*. Zoom in/out. 

*. Sent your notes directly to Printer.

*. Undo/Redo. 

*. Save files (saves all the changes such as text highlighter, font, ruler, etc).

*. Full Screen mode... are just a few to mention.

You can install Xournal in Ubuntu 11.04 Natty Narwhal, 11.10, 10.10 and 10.04 by using the below command in your Terminal window.
sudo apt-get install xournal
Remember, Xournal is only a note taking software and cannot edit text files thus it's not a text editor. But the rest assured, this is probably one of the best (although the developers could invent the ability to share notes online which seems to be missing at the moment) that I've come up with without a doubt.

So, if you're searching for a Note taking app for Ubuntu that needs very little space (below 500Kb of size) + that has a beautiful looking GUI and lots of tools, then I highly recommend that you take a look at Xournal, because it's totally worth it!.