Pages

Showing posts with label ubuntu. Show all posts

How to Remove Unused Packages & Save Space in Ubuntu/Kubuntu?


Whenever you install an application in your Linux distribution (say in Kubuntu 20.04) the package manager usually installs other packages with it as they are required to run your application. These packages are called 'dependencies'.

However, when you remove that application there is no guarantee that those packages too will be completely gotten rid of. Over time, these unused packages can occupy your hard disk space if not attended. These days disk space is quite valuable if you have your operating system installed on a smaller but fast SSD, for instance.

The package manager apt used in Kubuntu/Ubuntu does have a built in function that addresses that very issue. It's called 'autoremove'. So once every while you should run this command to remove your installed but unused packages not only to save disk space but also to clean up the system. apt however will notify you of such remaining packages whenever you use it. But if you don't use it that often, then you will have to manually run the command to see if there are such unused packages that are occupying your disk drive's space (as you can see from the screenshot, I have a few packages occupying 390MB space of my SSD already).

To do that open up a terminal ('Konsole' in Kubuntu) window and enter the below command:

sudo apt autoremove

Then follow the instructions on your screen to get rid of them.

HTML5 Based Text Editor for Ubuntu Linux - GWrite!

The world wide web loses its meaning and purpose if the "contents" is only readable by either humans or computers. Thus the purpose of HTML (which is the basic framework of web pages) is to make the contents readable for both computers and humans since computers are still our slaves who's purpose is to search and structure the data so we can access them as efficient as possible (poor buggers :D).

Since its introduction, HTML has undergone 5 major "updates" and the recently introduced HTML5 is the newest version that brings a lot of changes (such as advanced multimedia support, etc).

Anyhow as said before, HTML is actually a way of representing data thus by using it as the framework, we can build pretty awesome (meaning powerful and features rich :P) applications with somewhat minimal of efforts (since we already have the basic layout from HTML for rendering the data, etc).

A quick picture not to make you bored with my little rambling :)...
For instance, the standard text format (.txt) cannot handle images or anything other than text. That's why we have word processors that have both the container format + a framework of their own for inserting/deleting pictures, links or other advanced things which the basic text format is unable to "understand".

But what if we could build a universal format that understand all these things, images, text, links, graphs, videos, audio, tables, etc ... well a web page such an app, isn't it? it can display these things by default. Why?, because it uses HTML as the "engine". So since HTML is an open "language" anyone can easily use its framework and build an advanced text editor (as with this case) or anything that's supported by the HTML protocol (sort of) with ease and that's what GWrite is all about!.

I'm sorry it took this long ... but I got all excited ;-).

Anyhow let me give you some of its features first...

*. Based on the HTML5 mark-up language and the UI is written in GTK+ toolkit.

*. Very simple window yet has a lot of features. *. Even supports "MS Doc" word processor container format!.

*. Insert text and make them: Bold, Italic,Underline, Change font size, Highlight text, etc.

*. As said before, unlike with a "traditional" text editor, you can insert pictures, tables (not the ones with chair and stuff :P), URL (links), HTML codes, LaTeX math expressions, etc.

*. View the text source in pure HTML or the usual humanly read version (without the codes, etc).


*. Add styles such as: Different headings, Bulleted/Numbered lists, Div tags, Block quotes, etc.

*. Undo & Redo.

*. Find and replace.

*. Word counting support.
These are among few of its main features to mention. Although it won't show any file other than in HTML or MS Doc by default but you can easily open text or other files by changing the attributes to "All files" in the open file window.

You can install GWrite in Ubuntu 11.04 Natty Narwhal, 10.10 and 10.04 (may even support 11.10, didn't check though) by simply entering the below command in your terminal window.
sudo apt-get install gwrite

So, if you're looking for an opensource, HTML5 based rich text editor (with excellent features I might add) that can be used in Ubuntu or GNU/Linux in general, then GWrite is a bloody excellent utility without a doubt!. Enjoy.

How to install Fluxbox Window Manager in Ubuntu ?

Fluxbox is a super fast window manager written in C++ that is being used as the GUI "creator" by many desktop environments. And just like with OpenBox (another WM) which is used in LXDE, Fluxbox is also extremely resource friendly thus it's especially being used in those "small GNU/Linux distributions" (you know small in size and resources, etc) nowadays more than ever as well.

Although the last time I tried it (bit of a long time ago actually), well it was really stable and fast but it did feel somewhat "sluggish" when it comes to minimizing or maximizing windows (with few delays just as with Openbox).

But if you want to give a try at this resource friendly window manager in Ubuntu, then the installation is pretty simple actually since it's in the official repositories. You can install Fluxbox in Ubuntu 11.04, 11.10, 10.10 and 10.04 by using the below command.
sudo apt-get install fluxbox
But as a Ubuntu 11.04 Natty Narwhal user, if you want to use the latest builds of Fluxbox window manager, then you can certainly make some use out of the dedicated PPA channel (thanks to Paul).

But remember, it includes the "Nightly Builds", so the packages may not be the most stable ones out there thus should only be used for testing purposes or if you want to get the latest updates of Fluxbox (and other related packages) but okay with the fact that it might drift you towards a bit of an unstable system (yikes).

To add it to Natty and install the latest builds you can use the below commands. As usual, open your terminal and enter the below commands.
sudo add-apt-repository ppa:fluxbox-maintainers/nightly
sudo apt-get update
sudo apt-get install fluxbox
Then log-out and on the GDM log-in screen, just choose "fluxbox" under session. That should do the trick. But remember, this fluxbox WM only supports Gnome and KDE desktops + it will not support Unity or Gnome Shell interfaces since they're build using entirely different, a bit advanced compositing WM such as Compiz and Mutter.

But don't hope to get the same level of features with fluxbox as with Gnome or KDE for instance because at the end you'll be disappointed!. 

And while using the "Fluxbox" desktop session, if you launch apps such as Nautilus file manager, then you'd run into trouble because Nautilus will try to replace the desktop management instead of fluxbox!.

But as a quick solution, we can disable Nautilus for dealing with your desktop. To do that, open the terminal window and enter the below command.
gconf-editor

Then from the window that you get, go to: "apps" -> "nautilus" -> "preferences".

Now to your right-side scroll down until you see a setting called "show desktop" (as with below screenshot). Remove the check mark and it should solve your problem.
This will also disable desktop icons, etc in Gnome classic and Unity too. So, unless you're gonna be using Fluxbox as your primary somewhat desktop... then this could be a headache :)...
But as said... although it's quite fast, still, fluxbox window manager is certainly not for everyone. There I warned you! :P. 

Ubuntu 12.04 LTS Gets the Official Code Name!

As most knows, with almost all the other GNU/Linux distributions (or other major software projects in general), Ubuntu also assign a code name every time they release a new version of their operating system. The current version number is 11.04 has the code name of "Natty Narwhal" and the upcoming 11.10 is called "oneiric ocelot".

I'm not a marketer thus have very little knowledge about how or why code names are used... but I guess it has something to do with branding. Anyhow, few hours ago, Mark Shuttleworth announced (the founder of Ubuntu OS) the official name for the upcoming 12.04 which will be released in 2012 April (if everything goes according to plan) and it'll be called, Precise Pangolin!.

As always, Mark had something interesting to say about the name (or the creature behind the name actually)...
"Now, I’ve recently spent a few hours tracking a pangolin through the Kalahari. I can vouch for their precision – there wasn’t an ant hill in the valley that he missed. Their scales are a wonder of detail and quite the fashion statement. I can also vouch for their toughness; pangolin’s regularly survive encounters with lions..."
Anyway, the 12.04 release has another importance also since it's the "Long Term Support" (a.k.a LTS) which is for those who just can't stand for having to update their OS once every 6 months. So, once every 2 years a LTS version is released which carries no particular differences in packages but will be supported by Ubuntu (updates, bug fixes, etc) up to 3 years for the desktop edition and 5 years for the Ubuntu Sever Edition.

And in somewhat a recent interview, Mark said that they "might" replace Firefox with Google Chrome which could have happened with the 12.04 version but since it's the LTS version ... it won't. But it could be something that'll take place in the 12.10, perhaps.

Anyhow if you're wondering about the official code name for the upcoming Ubuntu 12.04 (both LTS and the standard versions)... then it's Precise Pangolin and it's all about surviving the "lion"!

How to Split or Merge Files Easily in Ubuntu?

Almost all the popular file compression tools (archive managers) have the ability to split files and then merge them later, which is also the case with Ubuntu. Thanks to the default archive manager (called File-Roller), you can split any file by using it as long as you're using a compression format that supports file splitting (.rar for instance).

But the problem of using A compression container format to split files and store them has a bit of a known risk. I think most would agree that (at least in my experience) some of these split files have a tendency to be corrupted, which is a common "headache" concerning file downloading. For instance, have you ever encountered a "CRC error" while trying to re-merge a file that was split and stored in the .rar compression format?? (errrrrrrrrrr :D).

So, to avoid or minimize these sort of difficulties we need to have a dedicated, specially designed file splitter. Although under MS Windows there a lot of free tools (HJSplit is pretty famous) available so is with GNU/Linux too!.

It's ridiculously awesome! :D...
If you'd like to play with your command-line a little bit then there are few dozens available but if you want something with a GUI "attached" to it :)... that can be used under Ubuntu Linux, then Gnome Split is a utility worth trying.  It's written in Java and uses the GTK + toolkit thus integrates really well with Unity as well.

Main features...

*. Split and Merge any file.

*. 2 Times faster than the previous version according its the developers.

*. Even includes a "Wizard" for both splitting or merging.


*. Change file split using size or raw values, location, etc.

*. Use generic algorithms or different methods.

*. MD5 integrity checking.

*. Shows progress with speed, etc.


*. E-mail files afterward.

*. Enable/Disable notifications & few more settings can be accessed via the "Preferences" window.


You can install Gnome Split in Ubuntu 11.04 Natty Narwhal, 11.10 Oneiric Ocelot, 10.10 and 10.04 easily by using its PPA channel. To do that, as usual, open your terminal window and enter the below commands.
sudo add-apt-repository ppa:gnome-split-team/ppa

sudo apt-get update

sudo apt-get install gnome-split  
So, if you want to avoid most of those merging errors + looking for a extremely easy to use, features rich, fast file splitter/jointer (PDF, .PST, multimedia files or anything!) that can be used in Ubuntu (or GNU/Linux in general), then Gnome Split is certainly one of the best out there without a doubt!.

Wanna Add an Awesome Looking Ubuntu 11.10 Oneiric Ocelot Count-Down Banner?

Ya all Ubuntu Linux geeks, are you excited or what! :D. It's like 11 days left for the official Ubuntu 11.10 Oneiric Ocelot release which brings some new features (the Kernel 3.0, Gnome 3 support + some other major changes, etc). So, out of the excitement, perhaps you could be thinking of adding a count-down banner on your website, just to show-off? ;-).

The default banner looks OK... but for a change would you like to add a third-party created awesome looking banner which includes the Wall-e robotic dude!. As you can see below, Wall-e has promised to keep holding the banner until Ubuntu 11.10 is released :D. 


How can I add it?

Simple. You just gotta copy and paste the HTML code to your web site (on blogger it's pretty easy, just add a new HTML/Java code widget and paste it in and save your changes) the steps will differ according to your hosting platform.

Currently there are 6 types of banners and the codes can be obtained from this j_baer's blog (all credits goes to him for this beautiful banner, thank dude).  

Ubuntu Font Family Version 0.80 (with "Mono" at last!) is Released

Ubuntu font family is a completely free, open font sets that are release under the Ubuntu font license. Although it's not that long ago they were released thus some of the standard sets such as the the "Mono" fonts were at the beta stage previously. But today the Ubuntu Font Page made it official that with the latest 0.80 version, now the "Mono" version is also included!.

If you're a webmaster then you can easily "install" these fonts thanks to the Google web-fonts API. These fonts are inspired by the Sans-Serif fonts and comes pre-optimized for desktops and mobile device screens especially according to Canonical.

Although personally, at smaller sizes I find it a bit difficult to read (could be a personal thing :D) and in general I'm not quite fond of the overall "square-y" type physical attribute which again I find it a bit hard to read (in comparison with the beautiful Arial font for instance.

Anyhow, if you're looking for a completely free fonts with minimal of restrictions (if none at all) then why not visit this Ubuntu Fonts page and download it!.

Simple Personal Information Manager (PIM) for Ubuntu: Vazaar!

If you live "around" your computer all day long :D and also quite busy already, then having a simple yet an effective personal information manager software (you know all the features & also the ability to backup your PIM data, etc) is pretty handy. Although the Gnome desktop used to come with a one of its but it was "let go of" long ago thus if you use Ubuntu Linux and looking for a simple PIM software, then Vazaar is an excellent application.

Remember, the last time it was updated was around 2010 and the current version is only for Ubuntu 10.04 (but does work in 11.04 anyhow), so it seems that the project seems a bit outdated.

But as said, if you're looking for a simple utility that lets you easily manage your daily tasks... then Vazaar is an Open-Source PIM suite that can meet most of your needs nonetheless.

Main features...

*. As said, has a simple GUI that runs in the notification area, easy to getting used to.


*. Add notes.

*. Add diary/Journal entries.

*. Bookmaking and tags support (makes it easy to search and find).


*. A welcome window that gives you a quick sneak-peak into things.

*. Annotate notes/diary entries and other resources.

*. Open or Edit your resource with appropriate programs. For instance, you can simply right-click on a note and open it in your default text editor for advanced editing.

*. Add resources (easily "attach" files/folders to your entries).

*. Plugins and Tag managers. 

*. Delete entries.

*. Create collections and link your entries to them.


*. Uses MySQL and SQLite for database handling.

*. Backup your PIM data (both import and export support actually).

*. Semi Automated data base updating by analyzing your PC meta-data, clipboard, etc.

This is no magic since almost all PIM suits supports these features but just to mention: Both "Mplayer..." & "Vazaar..." entries were added by the suite after analyzing my clip-board memory data which will also add entries to tags as well...
*. Switch between full-screen mode and a windowed mode... which are among the main features to mention.

You can install Vazaar PIM in Ubuntu 10.04, 10.10 and 11.04 Natty Narwhal (not sure whether it'll work under 11.10 though) by first downloading the .deb package from this Vazaar downloading page.

And then simply double click on it which should open it in your Ubuntu Software Center. Just follow the on-screen instructions. The rest is automated.


As a final note, if you're looking for a simple yet a powerful personal information manager with reasonable amount of features + the ability to backup your PIM data with ease (in the somewhat universal database formats that makes the sharing is also pretty easy), then Vazaar is most certainly an excellent little utility without a doubt. Enjoy!.

Ubuntu 11.10 Oneiric Ocelot (beta 2) Review

Well, it's been quite a while since Ubuntu Developers started to roll-out the upcoming Ubuntu 11.10 Oneric Orcelot and few days ago they released the beta 2 version. Now, I've never used the 11.10 because it was too new and wasn't that much production ready, so to speak.

But after hearing the Beta 2 is out now we have like few weeks left and another RC left before the official launch of 11.10, I thought the Beta version 2 should be much closer to the official release of the long awaited 11.10 thus it's about time that I'd try to come up with a review.

So remember, all the feature that I'm gonna talk about are the changes from the current 11.04 Natty release thus if you've used 11.10 since the beginning you may already experienced these features (so don't blame me dudes! :D).

The desktop is identically the same, except the "right-click" now is even simplified (the "Create new Launcher", which is useful as hell for some, is removed)...
Gnome 3 (also known as Shell) has a lot to do with Unity, still!

As most knows, Unity carries some fundamental difference the way desktop UI designs, etc. But it still uses a lot of Gnome's applications thus most of the differences that we see in individual applications such as in "System Settings", user management, etc are due to the changes in the Unity's implementation of the Gnome 3 applications.

Let's begin with some of the changes in the Unity interface changes...

*. "Dash" icon: Except for a single major change, the application launcher is almost the same as in 11.04 version and still it lacks some serious customization abilities.

Anyhow, the most noticeable change is the "Dash" icon, which is now sits on top of the launcher which used to be on the left edge of the screen.


As many others, I also think this is a good move since it helps to make the most out of the screen since if you use something like a small screen device, say a netbook, then every pixel counts!.

And when you click on the "Dash" icon then on the left-edge we're greeted with a a "close/maximize" buttons (the minimize is disable which makes sense). So now you can easily close the window by using your mouse thanks to this without the need of the "Esc" button. 


*. Buttons on the "exact left-edge": Thanks to the little movement of the "Dash" icon, now buttons are arranged on the very left-edge on the screen previously they used to just after the "Dash" icon. This helps to give a more sensible location + until you maximize a window you'll see a the name of the app/window (or whatever that you're using) on the left-edge (as with below screnshot).

Note the "Text Edi" to the left where the "Dash" icon used to be...
Also when you use an application in full screen mode the buttons are hidden by default a and are only visible when you move the mouse pointer over to the top panel. This helps to give a much more cleaner and uncluttered look. So in general, I personally like what's gone with the "Dash" and the "Buttons".


*. The new "Alt-tab" UI: This is another beautiful looking "window switching" utility which was implemented sometime ago. But for some reason, while I was using it, if I had already an un-minimized window on my desktop screen then the "Alt-tab" display behind it which is not helpful at all since to serve its purpose it should always be on top of everything.

Other than that it looks beautiful and worked nicely.


*. New appearance Window: The appearance window section has also gone through some major changes and I gotta say it looks more polished and professional.


Arranging or adding images is really easy too but the themes have been reduced to four. The standard Ambiance theme + the Radiance version is there as the default ones and two version of the "High contrast" themes ... that's about it for themes.

This makes sense in a way and I guess having one or two themes by default helps the "branding" of Ubuntu but as long as you have a working internet connection around you... installing a new one is pretty darn easy nonetheless.

The Ambiance theme also has gone through few changes it seems. The tittle bar has lost somewhat its "3d-ness" as you can see with the below screenshot when comparing with the 11.04 version.

Perhaps the middle strip is a bit too "thick/sharp"...
*. Nautilus: The default file manager is Nautilus 3.1 that's also shared between Gnome Shell and Unity and the "Path-bar" is now black and looks ugly (at least for my taste). I don't know whether its the "arrow" or the squared version of the selected path on the "path-bar" or the new look-n-feel in the sidebar, but Nautilus looked really weird :D.

"Something is wrong with me... help!" :P...
I think that it's the side-bar color that jeopardize things here since it doesn't go well withe the Black title and Pathbar ... so if they can do something about that + add a bit of a 3D separator to the side-bar... well I think it could solve some of the issues (any ideas??). 

*. All new Ubuntu Software Center: This is another major decision by Canonical to drop the Synaptic graphical package manager and replace it with the Ubuntu Software Center.


Now in the past USC was painfully slow and did require reasonable amount of system resource while installing applications, etc. But the 'new" one feels a bit faster and has gone through some major changes, at first I didn't even recognize her! (kidding).

Although the "Our star apps" takes a huge space out of that window which is waste since as long as I was using it didn't do anything other than displaying that "message". The only good thing about is that you can access all the "starred" apps by clicking on it. Other than that... that's A waste.

Users: Um, what exactly is your purpose again? | USC Star-apps Logo: "Well I'm here for... oh you know, I mean I do that... that, but ..."
 Anyhow, when compared with the current USC in 11.04 the "Installed/Get/History" buttons are moved to the top and the categories are to your left and in the middle sit the "starred" apps. A quick reminder, if you want "Synaptic" back (heck you do :P) then simply search "Synaptic" and simply follow the on screen instructions to install it (ahh finally :D).

Other that the UI changes the performance is also improved but not by a huge margin, while I was using it. And I don't think they can make it as fast as Synaptic because USC is designed for achieving different goals (Mark did mention about "different ways of monetizing Ubuntu", nothing wrong with that anyway). But there's still room for improvement but for a start, this is not bad.

The preferences window and the menu are almost the same and nothing major to report there.

"ahh the same old me..."
*. System Settings: This is another area that has gone through some changes and it feels like you're inside Apple Mac OSX Lion :D. I actually liked the "old" interface in 11.04 but in a way this new window lets you access things much more faster.


And as said, most of the individual application changes inside the System Settings, such as Keyboard layout changing or user management is due to the Gnome 3 changes thus has nothing to do with Ubuntu.

The new "Screenshot tool" does something cool (highly relative :D). Now whenever you take a screenshot, it'll output a camera shutter sound + will "white" the heck out of your screen too :).

Ehh... what was that all about! :D...
And as many knows, Ubuntu 11.10 comes with a backup software by default called DejaDup which you can access via the System settings which will be appreciated by many for its simplicity and usability.

Other minor changes includes such as: the default image viewer is the one comes with Gnome desktop thus if you wan to crop, etc then you'll have to use the Shotwell (which is also installed by default).

LibreOffice still comes without the "indicator menu" support. If they can't find a work-around that... it could be a bit disappointing when 11.10 comes out.


Oh one more small thing, the Terminal window now has a small White strip around it (as in the below screenshot) which looks awesome!. Since this is still one of the most widely used utilities in GNU/Linux... I think most would love it.


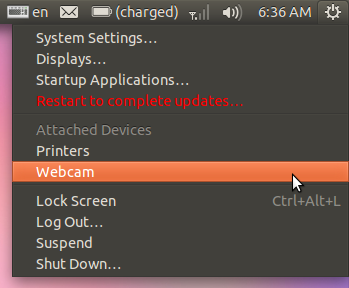
The "System Settings" menu has also received few new options. Now you can use it to configure network printers, add a web-cam software (which will take you to installing the Cheese web cam utility in USC), access display settings (another useful update) and startup applications and can configure attached devices directly from the menu as well.


The Shutdown menu is also changed quite a little which now lets you reboot as well.


How was the performance??

Well, I didn't measure the seconds but things were noticeably faster (startup/boot, etc) and the new LightDM theme also loads fast (looks good too). If you use AMD fusion chips, then 11.10 comes with the latest builds of the Kernel 3.0 which brigs enhanced support for these never chips (including ARM). I'm also quite pleased with the open-source ATI/AMD GPU driver which worked really well under Compiz without any issues whatsoever + it detected my monitor this time correctly.

As always, if you want the best performance, then I highly suggest that you install the proprietary driver.

But I'm not entirely happy with the ACPI since the Fan on my netbook kept running in  a decent speed (even while I wasn't doing anything at all) but I cannot blame this on Ubuntu since it could be some issue with the Kernel and most probably is related to my hardware specifications.

To be honest I've been one of these that criticized the Unity desktop for sometime but after using it for sometime + when looking at the changes in the 11.10, although they aren't that "huge", but from a users perspective these small changes do make a difference and I actually love the Unity desktop. 

But as with Gnome Shell, Unity has its issues and some absolutely hate it (which is totally understandable, but for me personally it only needed just a little getting used to).

But if you're an average computer user or someone who's new to GNU/Linux and still learning about Ubuntu and other stuff from scratch and looking for a professional looking GNU/Linux distribution that's slightly faster than the predecessors + which is user friendly too: then I gotta say that I was a bit wrong about the Unity interface and even though it's still at its beta stage, yet, I think Ubuntu 11.10 looks really good.

So if you can't even wait till its out officially... then other than installing it in commercial environment I think it's really stable (although Nautilus 3.1 crashed ones, yikes!) enough that you can give it a try, safely :). Good luck.

Ubuntu Tweak 0.6 (beta) Review

To be honest, just like with most others who've been using GNU/Linux for some time now, I had it quite rough with GNU/Linux. I started with RedHat Linux and had to figure out how to compile and install applications, didn't have a broadband Internet connection thus I manually downloaded the source code from else where and after or while doing the "./configure", bugger used to give me "dependency" errors about which I had no clue what the heck was that all about at that time, etc. So learning GNU/Linux wasn't the most enjoyable task.

But in a way I'm glad that it happened that way. Because I love computers and it taught me a lot. But most of my friends who didn't (still don't :D) care about OS and whether it's free or not... they just wanted to something to watch a movie and play few games thus no one made their peace with GNU/Linux :. So from their point of view, having the ability to customize the OS "here and there" easily does make a difference. 

In that sense for all ya non-geeks who's leaning Ubuntu Linux from scratch and if already a bit frustrated with the Gnome (Unity included) desktops' lack of customization features and thinking how nice it would be if there's a utility not necessarily lets you access a huge list of options but gives you the ability to sneak-peak into some useful tweaks... then Ubuntu Tweak is certainly one of the best!.


The last time I tried it was about few months ago. And few days ago the developer announced the availability of the Ubuntu Tweak 0.6 Beta which brings a lot of new changes (specially concerning the UI). And after using it for a while it really impressed me and I thought that I should brag about a bit :P.

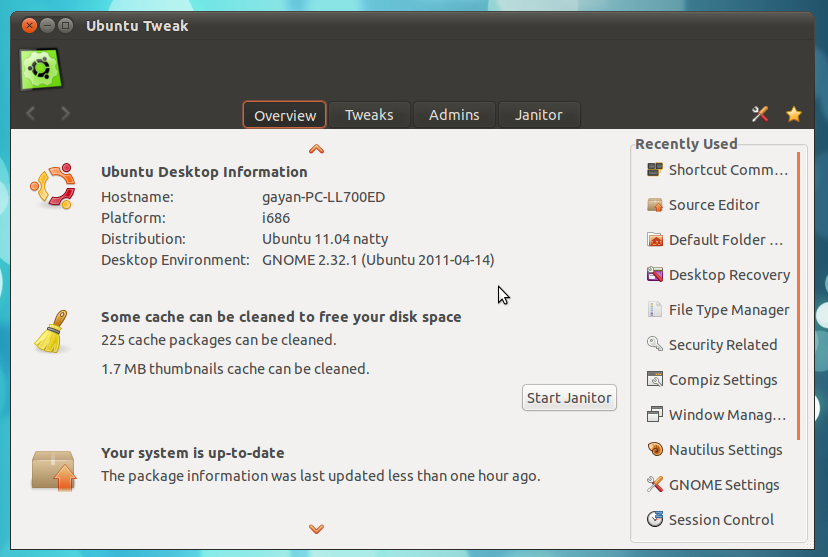
*. As said before if you've used it in the past then you'd remember the options were located to the left side of the screen and the "sub options" were located on the right side. But with the 0.6 beta version the "tabs" have been moved into the top center of the UI and their options are reveled right under them which is pretty cool implementation in my opinion.


*. Overview Tab: This is sort of the "welcome screen" and give you an overview of your Ubuntu computer. Things like your basic hardware details, OS version, tips such as how much you could gain by removing the cache files, whether your system is up to date or not, etc.

*. Tweaks Tab: This contains some additional tweaks per few popular individual application that you can edit manually using the Gconf-editor. But since the UT has implemented things more graphically... if you want to edit things like


1. Log-in settings: Enable/disable play sound at log-in, Disable user list in GDM, change screen logo and background.

2. Change Session settings: Such as disabling, reboot, shutdown, log-out buttons and changing the window manager/file manager + Panel settings.

3. Few Gnome desktop related settings: Change the desktop menu icon, enable panel animations, disable "history" list, etc.

4. Nautilus file manager settings: Show advanced permissions on file/folder properties, display location entry instead of path-bar and few thumbnail related tweaks.


5. Few Metacity Related settings: Run Metacity as the compositing manager, enable/disable transparency, change the button layout and location, etc.

And few other Compiz, security, power manager and few "workarounds" are also there.

*. Admins Tab: You can use this tab to access few administrative options such as taking "desktop" backups (very useful), edit default folder location/layout, repository source editor, file mime-editor but the "shortcut commands" doesn't work at this moment (guess it's still under development).


*. Janitor: Although Ubuntu has a Janitor app of its own which is know to cause problems after using (errrrr :D) but Ubuntu Tweak lets you things like: Clean the Nautilus Thumbnail cache, remove PPA from the synaptic list and remove apt-get cache (+ few other cache related settings).


And if you want more tweaks then you can easily install them using the "Preferences" window too. On the main window to the right-side UT also displays a list of your recently used tweaks as well.


You can install Ubuntu Tweak 0.6 (beta) in Ubuntu 11.04 Natty Narwhal and 11.10 by using its testing PPA channel. To do that, use the below commands in your Terminal window.
    sudo add-apt-repository  ppa:tualatrix/next
    sudo apt-get update
    sudo apt-get install ubuntu-tweak
I tested it on Ubuntu 11.04 and worked without any issues. But the 11.10 Oneiric Ocelot support at the moment is not as good as with 11.04 according to the developers. Anyhow, just remember, Ubuntu Tweak is still at its beta stage thus I don't recommend anyone to use it in their "serious computer" :).

But if you wanna give a try at this excellent, all in one type Ubuntu Customizer, then even though the UT 0.6 is still at its beta stage if you want to access few additional tweaks of individual apps and the OS core files, then it looks awesome (say goodbye to learning Linux, just kidding! :D).

How to Access Few "Advanced Preferences" Settings in Nautilus File Manager?

Nautilus is the default file management utility in Gnome desktop environment (which is also shared by the Ubuntu Unity as well). Although Gnome had been folliwng a lot of Mac OSX type desktop design ideas for a long time now, thus it's a highly simplified desktop these days. Yet in the past it used to come with a hell lot of options or customizable abilities.

Luckily, for the advanced users ;-), we can access some of those "dropped" features via the built in Gnome desktop database configuration utility called Gconf Editor. So using this we can change few additional settings concerning Nautilus with ease which are otherwise, "hidden".

For instance, once right click-ed on a file/folder and accessed its properties, currently Nautilus does let us change the permissions with a pretty simplified window which is cool. But...

There's certainly nothing wrong with this... but I just happened to like the "old" window since it helps to speedup things a bit (adding permissions I meant :D)...
... if you want a little more control over the file and folder permissions window (including few more options such as set user and group IDS, sticky) and in comparison, this "advanced permissions" (it's not that advanced actually since the default one come with almost all the features, except for those mentioned "3" features) makes it easy to adjust the permissions in my experience.

But some of these preferences are already in the default "preferences" section in Nautilus but you can access few additional settings such as:

The "preferences' section of Nautilus in Gconf-editor's database...
*. Make Nautilus always display a "location entry" type bar rather than the default "Path bar".

*. Directory limit: Another useful feature (not for all the users though). For instance, let's say that you have a folder filled with thousands of files, etc.

Although Nautilus is more than capable of handling a "heavy weight" folders these days yet if you have some "massive folders" then you can manually assign a number that Nautilus will take into account while dealing with them. The default value is "-1" means "unlimited". As said, I just mentioned this but I don't think most of us would wanna change this anyhow.

*. Disable/Enable mount forward and back buttons.

*. Change how Nautilus search for files (whether using just the "text" you typed or properties).

*. Show Desktop: Just like with Gnome 3 (yikes! :D), if you disable this function, then Nautilus will disable your Desktop completely. Although nothing on your desktop will be lost (created folders and files) but your mouse right click or anything on the desktop will be hidden!.

These are just a few to mention. Anyhow, how can you access these "hidden" preferences in Nautilus using the Gconf-editor?

1. Pretty simple actually. First press the "Alt" + "F2" keys and put the below command into the box and press enter.
gconf-editor

Now from your left, go to: "Applications" -> "nautilus" -> "preferences".

This should openup a window similar to to the below one. Now to your right side you should see few options which you can use to access some of the ones that are hidden by default.


For instance, let's say that I wanted to enable the "Advanced Permissions" dialog in Nautilus. Then, from the "Preferences" section scroll-down until you see an option called "show_advanced_permissions" and make sure to put a "tick" on its box which should give you a slightly "advanced" file/folder permissions windows as with below screenshot.


That's about it. Use it with caution ;-)...

Ubuntu 11.10 Oneiric Ocelot Beta 2 is Released!

It's been like 2 or 2.5 weeks since Canonical released the Ubuntu 11.10 beta 1 and few hours ago they've released the last of the "testing versions", the 11.10 Beta 2!. This is the last of all "tests" and all that remains is the official release of the Oneiric Ocelot, scheduled at 13 October 2011 (man I'm so excited!, I can criticize, etc... a lot to write about :P).

With this release they've finally made it possible to fit it inside a standard CD (about 695MB for the 32-bit version) and more ARM architecture support has been added (via different disk images). Below are few of the new updates in the 11.10 Beta 2 version

*. Gnome 3 has been updated to the latest beta 3.1.9 which is on its way to the official Gnome Shell 3.2 released. A quick remainder for those of you who've been just woken up from your hibernation sleep ;-), remember, Gnome 3 is well supported in Ubuntu but it is not included in the default CD disk image. But you can install it via the online Ubuntu repositories nonetheless.

*. Includes the Kernel 3.0.4 version.

*. Comes with the Mozilla Firefox 7.0 beta 6.

*. And Thunderbird 7.0 beta 3.

*. Synaptic is removed (as most knows) but also the default video editor PiTiVi has also been removed.

*. LightDM with a new theme.

*. Banshee 2.2.0.

*. Shotwell 0.11.1.

These are the usual main apps to remind and as usual the Ubuntu Software Center is also updated with some bug fixes, etc as well. All the other official Ubuntu derivatives such as Kubuntu, Xubuntu, Lubuntu, etc have also released their Beta 2 version simultaneous to this release too.

As mentioned, from now, since the CD disk image fits into a 700MB CD, now you can download the beta 2 and use it as a LiveCD rather than the USB version with some of the previous "alpha and beta" versions.

If interested, you can get it from this official release page. Good luck.

Multitrack Audio Editor/Recorder for Ubuntu: GNUSound

If you have a lot of multitrack audio files that need a little editing and looking for a software application that lets you do it without getting in your way, then GNUSound is an excellent little utility.
Although we do have the more popular Audacity which is a very powerful audio recorder and editor itself, but if you're looking something similar in natures + comes recommended by the GNU dudes themselves ;-), then GNUSound is also a very competitive one without a doubt as well.

Main features...

*. Has the ability to load and edit audio file types such MP3, WAV, OGG Vorbis, FLAC, AAC etc. But unless you have installed Lame MP3 encoder for instance, then you won't be able to load and edit MP3 files using it.


So if you want the maximum usability out of it, then make sure you have installed appropriate audio package separately. You can get more info from here.

*. Cut/Copy/Delete/Paste using the time-line window section with ease.

*. You can even import audio track inside a lot other multimedia containers using the ffmpeg libraries installed as well.

*. Amplify, Bandpass, delay, fade, normalize, reverse playback, etc are just a few of the built in tools.


*. Play and Record audios.

*. Zoom in/out.

*. Lots of selection based features such as: left, right, nudge left/right, snap to grid, etc.

*. Playback and Record supported via Alsa, OSS, Jack or Dummy audio servers.

*. Change sample rate 8/16/32, audio channels, bitrate, recording buffer size, etc via the "Preferences" window.


*. Insert or delete individual tracks.

*. Save audio track in different formats and error recovery (say to due to the application crash, etc)... are the main features to mention.

You can install GNUSound in Ubuntu 11.04 Natty Narwhal, 11.10, 10.10 and 10.04 by using the below command in your Terminal window.
sudo apt-get install gnusound
It did crash once I was using it but other than that it was certainly quite robust and was resource friendly too.

So if you're looking for an easy to use, fast loading multitrack audio editor and a recorder for Ubuntu (it's designed for the Gnome desktop actually) that comes recommended by the GNU foundation, then GNUSound is certainly a simple yet a powerful utility which is also completely free! (including free as in freedom too :D).