Pages

Showing posts with label ms windows. Show all posts

OpenSource Audio Encoder for Windows - winLAME

As most knows, if all you need is to rip a CD into either MP3 or WMA format in Windows, then you don't need any dedicated app since Windows media player is more than capable of doing that. But if you want to convert few additional file types such as MP3, WMA, WAV, AAC, OGG into other multimedia formats with ease and looking for a completely free, open-source application, then winLAME (named after the famous Lame encoder, I think) is a pretty cool one.

It has a Wizard type interface which literally guide you through the whole process ... so it's quite the newbie friendly app :). It uses few of the free plug-ins to expand its converting ability thus you can use it as an easy AAC to MP3 encoder as well. .

Main features...

*. As said supports both encoding and decoding of various audio formats (both lossy and lossless) such as: MP3, Ogg Vorbis, Flac, AAC, WMA, aiff, voc and many more!.


*. Also supports converting/ripping audio CDs from the interface + online CD data fetching (album name, year, Genre, etc).


*. You can easily set encoding option for more than a single file thus if you have a bit of a "list" of files needs to be converted using the same audio quality settings... this is certainly handy.

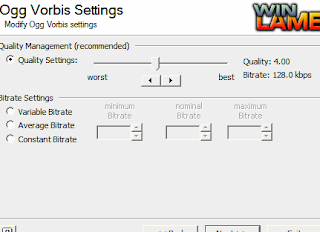
*. Change quality based settings with ease with the sliders or manually assign the Bitrate according to your preference.


*. Automatically delete (can be disabled) the source file afterwards ... are its main features to mention.

I tested it with a MP3 file to OGG... and I gotta say that in the past OGG was slightly slower than MP3 when it came to converting (although OGG has always the better quality in comparison with MP3 at the same Bitrate) but with winLAME it certainly encoded the file really fast!. It also comes with pre-CPU optimized libraries that supports AMD 3D now and other Intel based multimedia settings, etc.

So, if you're looking for a free & open-source (GNU/GPL licensed) audio converter/encoder for MS Windows (supports 98 up-to Win 7), then winLAME is an excellent little utility that's worth trying.

Get it from this winLAME home page.

Free & OpenSource CD/DVD Burning Software - InfraRecorder

Starting with Windows XP ... it's true that Windows in general comes with a basic built in CD/DVD/Blu-ray burning utility. But if you want a dedicated optical disk burner with some decent amount of features that also happens to be free  and opensource :), then InfraRecorder (only for MS Windows) is a pretty cool application that I've been using from time to time.

Although when comparing with professional burning suits such as Nero for instance, InfraRecorder is nowhere near that quality but for everyday CD/DVD burning needs... this free tool can certainly live up to most of our needs.

Main features...

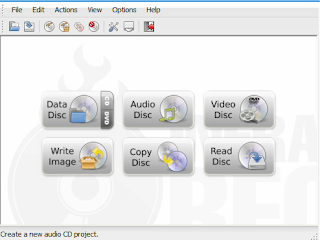
*. The GUI is pretty simple and is a bit similar to the one that you see with most other utilities... as shown below.

"Welcome Screen"...
*. Create Data/Audio/DVD-Video or create disk images + burning images.

*. Session import support (sometimes necessary while burning multi-session disks).

*. Close and Erase CD/DVD-RW.

*. Create disk copies on-the-fly.

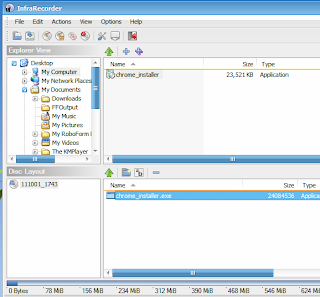
*. The burning window is also extremely similar to the "Nero Burning Rom". Adding/removing files is pretty easy.


*. Change few advanced settings such as: Change buffer size, associate with disk image extensions, enable/disable windows explorer context menu, etc.

*. Create Boot-able disks and change ISO format settings, UDF file system related settings and add publisher name, Volume set, Date of Burning, etc.

*. Get advanced disk information (not always used but can come in handy sometimes)... are among the main features.

And since the recent versions of Nero uses a huge amount of system resources, it certainly ain't the most fastest around the corner these days. But InfraRecorder on the other hand is a fast loading, extremely resources friendly application that you can safely run even in your "old" computer as well.

Anyhow, if you're looking for a simple & fast loading Open-Source CD/DVD burning application software (which won't be able to replace Nero suite by any means but...) to run under Windows, then InfraRecorder is a pretty decent app.

If interested, you can get it from this InfraRecorder home page.

A Portable Search Tool for Windows: Dropout

Index is the single most important thing for any search engine. The more faster and efficient it is ... the better the results are (obviously). Starting with Windows Vista, the Microsoft operating system uses an advanced index that gives you extremely faster search results when comparing with the latter versions such as 98 or XP for instance.

But still, to achieve this relatively "faster" performance, first Windows has to create a data-base (index) of your attached drives and that can take sometime. What if you have a big USB drive (12-20GB) filled with a lot of files that's always on the move. Then if you plug it in a new computer then searching can be quite frustrating since there's no index for Windows OS thus it will take sometime for it to analyze the files and give you your results.

Even more, sometime there could be file types that the Windows built in search utility don't understand. In that case it simply cannot deal with them thus even if has an index of your portable USB drive, still you won't be able to search for those files (for instance, unless a dedicated plug-in is installed, Windows index won't be able to search within the content of a PDF document).


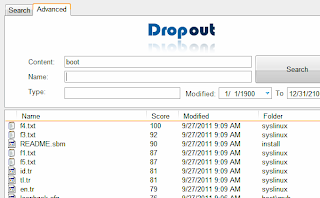
In that case if you're looking for a portable "desktop search" type application that is really fast, creates the index a hell lot faster (even lets you search when an index is being created) + has the ability to deal with a lot of different file types ... then Droupout is an excellent solution.

Main features...

*. Portable (just copy the .exe file to the root directory and it'll scan all the files within that directory automatically).

*. Ability to use advanced search expressions such as "AND", "OR", etc.

*. Refresh the index.

*. Exclude certain files.

*. Auto-complete using your previous search history.

*. Open files or their containing directory... are few of the main features.

I tested it with my USB drive that contained files around 190 which is not huge but Dropout indexed it within few seconds!. So, if you're looking for a completely free, portable search tool that can be used in MS Windows... then why not give a try for the Dropout!.

How to Access Advanced Power Options in Windows 7?

Although the sole purpose of using MS Windows 7 in a powerful desktop PC is all about gaming :P... thus accessing advanced power settings makes little sense to most. But, if you use a portable device, say something like an Ultraportable Laptop or a Netbook, etc then configuring few advanced power settings concerning Windows 7 can come in handy.

When it comes to desktop UI designs it maybe true that you can learn a lot of from Apple Mac but the Gnome desktop developers can also learn a great deal from Microsoft. For instance, in Windows 7 (including Vista) Microsoft has done an excellent job of creating a pretty simple power related configuration window which is really good for the newbies since it doesn't "touch" a lot of advanced settings.

But unlike with the GNU/Linux default desktop, the Gnome, if you'd rather like to have some additional control over the computer then you easily do so in Windows 7. Most of the average users like me know how to do this. But for those who don't ... this is how you access that additional configuration settings that lets you change a big list of advanced settings concerning the ACPI of your PC.

1. First click on the Batter or the Charger icon on your notification area and from the window choose "More power options" as shown in the below screenshot.


2. Then from the next window that you get, choose the "Power plan" that you want these settings to be applied and click on the Link next to it that says "Change plan settings" which should bring a new window similar to the below one.


3. From the next window that you get, look for the bottom section and click on that says "Change advanced power settings" as with below picture.


Once you click on this link you should be reveled by a new window that lets you configure a lot of advanced power settings concerning your hardware through the ACPI (advanced configuration and power interface, a standard) and using this you can change some big number of settings such as:

Note: If you click on the "Change settings that are..." (marked in Red) link, then it'll only display the settings that are not available in the default/simple configuration window...
*. Manually change the Hard-Disk turning off time.

*. Pause the desktop background slide-show.

*. Change whether the Wireless adapter should give you the maximum performance or maximum power efficiency.

*. Enable/disable wake timers, change auto hibernate time or enable the Hybrid sleep mode (turned on by default for Desktops), etc.

*. PCI Express cards related settings.

*. Change Advanced Processor related settings such as: Cooling policy, Minimum processor state or Maximum processor usage limiter (which can have a significant effect on your battery life if you know how to balance things a bit :D), etc.


*. Display related settings.

*. Multimedia related settings such as : Enable/Disable media sharing, switch between performance and low power mode while playing videos.

*. Internet Explorer related Javascrpt timer setting.

*. GPU related settings.

My personal favorite is few of the settings that this window allows you concerning the battery. For instance, if you're trying to calibrate your battery then sometimes it's important to let it completely drain itself (0% or somewhere near). But by default, Windows will put your Laptop into Sleep mode when it reaches a certain point in its battery life (default is 7%) which is called "Reserve battery level".


But if you forcefully disabled it then when the battery reaches about 5%, Windows WILL put your computer into Hibernate mode which in this case (we're trying to calibrate the battery, remember? :D) is not what we want since we'd like our battery to die to its absolute zero or close. So in that case, you can use this window to re-configure and completely disable that default action which is very handy in my experience.

But once you're done with the calibration make sure to set things in their default values since these power modes do help to recover your PC from failures. Also remember except for some (such as the mentioned "Better critical..." settings) most of these settings are automatically adjusted when you change settings in the "Power Plans' window. But this configuration window gives a lot of advanced options that are sometimes necessary to get the most out of your PC nonetheless. Good luck.

Best MP3 Tag Editor for Windows - "Mp3Tag"

MP3 tag is actually a separate "container" (data holder) that helps to carry around data such as (concerning audio files in this instance) Title, Author, Track Number, Genre, Cover art, etc. In MS Windows you actually don't need a dedicated application if all you want is to edit the tag information of a MP3 file here and there since the OS has built in support for that (including WMA format) or even if you use Ubuntu Linux you can do the same using the Banshee player or something similar in nature.

But if you have a lot of audio files that need "mass editing" and looking for a free tag editor that a lot of additional audio formats, then Mp3Tag (Windows only) is an app that's worth trying. It supports all of the recent meta container versions starting from ID3 version 1.1 to 2.4 and has a simple yet a features rich window that makes the mass metadata editing a breeze.

Main features...

*. File formats supported: MP3, MP4 (i-Tunes), WMA, Ogg Vorbis (opensource competitor with the proprietary MP3), AAC, FLAC, APE, MPC, TTA are among the few.


*. Edit things such as: Artist Name, Title, Genre, Year, Cover-album art, Rename the actual file name, Change album-art cover genre, etc.


*. Add comments.

*. Add individual files or folder importing.

*. Export tag data and save to disk.

*. Arrange imported lists by Genre, Bitrate, Frequency, Album, etc.


*. Manage files once loaded using play-lists.

*. Case conversions (add/remove upper/lower characters).

*. Automatic tag data fetching via online sources such as: freedb, discogs, MusicBrainz, etc.


Once you've loaded your file/s to the main window, you'll see the extracted data of the tags to your left and by clicking on the appropriate field you'll be able to edit them with ease. As mentioned, you can use the online data fetching to fully automate the task (as long as you have proper file name or some tag data that denotes the actual audio file info such as Artist, Album, etc) as well.

Anyhow, if you're looking for a completely free (no ads, malware... nada, completely clean :D) mass audio tag editor that can be used in Windows XP/Vista and 7, then Mp3Tag is a pretty excellent one. If interested, you can get it from this page. Enjoy!.

Linux Live USB (Pendrive) Creator - Only for Windows

Creating a "Pendrive Linux" version out of your standard ISO disk image is pretty darn easy these days and if all you want is to create a boot-able (+ portable) Ubuntu OS out of your USB Pendrive then Ubuntu comes with a one of its own. But that utility will only work with Ubuntu ISO disk images only.

If all you have is nothing but a MS Windows installed PC and since there's like hundreds of GNU/Linux distributions out there these days, let's also assume that you have no idea of what distribution that you're gonna be trying next ;-) and looking for a utility that lets you create a boot-able Pendrive Linux that supports a massive list of distros +, runs inside Windows, then LiLi (or LinuxLive) USB creator is one of the best that I've come across so far without a doubt.

Main features...


*. A fully opensource utility.

*. As said before supports a massive amounts of distributions such as: Ubuntu (from 8.10 upto the Upcoming 11.10 beta!), Fedora (up to 15 and including the "spins" that includes LXDE, XFCE, KDE, etc), Linux Mint, Cent OS, Chraka Linux, Android x86 project, Mandriva, OpenSUSE, Meego, Lubuntu, Xubuntu, Vinux ... seriously guys, you could easily create a book out of the supported distro list!. Read more from this official page.

*. You can add ISO files directly from your HDD, create one on-the-fly using your optical drive or heck, if you have an internet connection, then you can let LiLi let you download one automatically!.


*. Supports both ISO and .IMG disk image extensions (although the IMG is still in beta).

*. You can either completely format your Pendrive or can leave the existing files and create the boot-able environment.

*. Built in virtualization support via VirtualBox: Basically this option lets you boot into the Linux live environment without rebooting your PC (to use feature you'll need a working Internet connection).


*. Also supports USB devices such as portable hard drives it seems (although I din't test that option since I don't have one :/).

Setting up a disk image is pretty simple and straight forward. All you gotta to do is choose/add your image file, then setup the "persistence" (this will be used as a virtual file system to store your file while using the Live USB key) and hit the "create" button. The rest is pretty much automatic.


All these awesome features + a beautiful interface, they all come for free!. Every time you launch it'll look for updates which you should not disable if you want LiLi to get the support for the most latest versions of GNU/Linux distributions.

Once the process completes, if you have enabled "Enable launching LinuxLive in Windows" option then you can try it directly inside Windows (remember, to run a virtual or a Host OS you should have some decent amount of system resources) or can just boot using the Pendrive.

If interested, you can get it from this LiLi USB Home page.

Best Network Bandwidth Monitor for Windows: Networx

I have an internet connection that has a monthly usage limit "attached" to it (errrrrrr). So whenever I browse the web, I used to log-into my ISP account and check for my daily/hourly data usage, which wasn't the most enjoyable thing in the world, to mention ;-).

Although both Windows Vista and 7 do come with an advanced system monitor their own yet most of the time they've failed to meet the requirements of "simple PC users" (like you and me ;-)). For instance, the built in utility of MS Windows fails to give me details such as monthly or daily data usage of my traffic, it cannot perform a speed test or it won't let you save your current bandwidth data to disk, etc either.

So in that sense, if you're looking for a simple, free but one of the best tools that display up-to-date information about your current network traffic/data usage, then Networx is a very impressive one without a doubt.

I'm not a network administrator but it also come with few additional features that can be quite useful to 'advanced dudes" like network administrators as well (more on that later).


This dedicated network bandwidth monitoring software comes with a very simple yet powerful GUI and lets you do things like...

*. Four built in bandwidth reports: Daily, Weekly, Monthly and Hourly.

*. "At a Glance": This is a nice little feature that lets you see a basic usage of daily, weekly and monthly within a single window.

*. Set Quota setting: By using this feature, you can easily set Networx to automatically notify your when you reach your daily usage limits (that are manually defined of course) or you can set up it to display a warning when you've reached a certain percentage of your daily/weekly/monthly data usage as well (pretty advanced stuff huh :P).


*. Dial-up Session: If you don't have a router that's always connected to the internet and uses a USB dongle instead, then you'd love this feature. This will display your data usage for your each session.

*. Custom: If all those daily/weekly/monthly, etc is not enough for your taste ;-) then you can manually define a time-frame and can view your date-usage by using the "Custom" section.

*. Multi user support.

*. A built in network speed meter.


*. Import/Export:


This is my favorite feature and the reason is simple. I use both MS Windows 7 and Ubuntu Linux in the same computer + uses the same internet connection. Now, Networx does not work in Ubuntu but since I do a lot of downloading (so I could write reviews for you geeks daily, lol) but as soon as I boot into MS Windows that data usage is not included in Networx (obviously).

So all I do is just remember the network usage in Ubuntu (using its system monitor) and then convert that amount into Kilobytes (using the calculator in Windows) and then I use the previously exported data usage of Networx in XML format and update the data-usage (manually) and restore the new updated XML settings file and Networx now displays the previously "missed" data usage under Ubuntu!. So it's really handy for someone like me :).

Although not super important, but you can access a lot of its options via the "Settings" section by using which you can change the Window opacity, make it display a very small graphs in your notification area, change graph colors, set what happens when you move your mouse over the Networx icon, etc are just a few to mention.


Networx has the ability to deal with simultaneous network connections + you can set it to ignore your LAN bandwidth monitoring as well. From visual alerts to shutting down the computer after a certain bandwidth limit is reach, disconnect your network connections and setting a master password ... it is certainly quite powerful.

Although most of the users may not use these features but Networx  has  few advanced features such as Ping and Trace Route, etc which can come quite handy for network administrators ...
Anyhow, if you have those above mentioned needs and looking for a dedicated network bandwidth monitor for which you don't have to pay any money whatsoever (it's completely free, no ads no spyware!) but can cope with the fact that it only works with MS Windows, then Networx is certainly an excellent utility without a doubt.

If you want to give it a try, then please visit this Networx home page for downloading or getting additional information. Good luck.

Advanced File Copy Utility for Windows: TeraCopy

By default "Explorer" is the one behind all your file management (including managing the desktop, etc) in MS Windows operating system. Over the years it has evolved really well thus in comparing with the Windows 98-XP explorer, now we have a pretty simplified, efficient and robust file management utility for the MS Windows "lovers" ;-).

Anyhow, concerning the file copying starting with Windows Vista, Microsoft added few enhancements to the file copying dialog such as showing the current transfer speed for instance (not the most useful features of all but). Still if you usually deal with a lot of file  copy/move activities daily then wouldn't it be nice if you could find a dedicated utility that gives you a lot of control-ability under those situations?.

For instance, lets say that you were moving a folder with thousands of image files within the same HDD and at the middle of this "activity" realized that you wanted something urgent (say, to open the web-browser and log-into Facebok, kidding) that would take reasonable amount of disk activity, then you either have to wait till Windows moves the files Or if you have to cancel it!.

But what if we could just "Pause" the file move temporarily and "Resume" it later!. So if you have those kind of special needs (you never know when you're gonna need one), in that sense, if you want an excellent, free utility (although they do have a paid version too), then I came across this one called TeraCopy few years ago and have been using it a lot lately, because it's awesome! :D.


Main features...

*. Copy/Move/Delete files.

*. Integrates into the Windows Explorer and "registers" it self as the default file copy/move handler.

*. Add files to a list: It's like a playlist. You can add any amount of files into the list and then later copy/move them all at once where with Windows you'll have to manually copy->paste each one (although most of the time you'll have to wait till one of few process are close otherwise it'll slow down the computer) ... but now you can just drag-n-drop into the TeraCopy window while it's busy copying others!.


*. Verify: Check for the integrity of your  file by using their CRC (cyclic redundancy check, a file-integrity error handling method).


*. Shutdown: You can tell TeraCopy to automatically shutdown your PC after the file copying is over.

*. When set, it can also automatically un-mount/eject drives.

*. Skip copying files in the list (only for the paid version).

*. Enhanced error handling: If you have a file that's unreadable, then before giving up TeraCopy will try for few times + even if it fails to copy it it won't terminate the whole process thus continue with others as nothing happened :D.

*. Pause and Resume (as explained above, you can simply interrupt the copy/move activities any time you want and resume them later!).


These are just few of the main features. Another thing, when you copy or move a file in MS Windows, if the file didn't copy 100% (say an error occurred) then Windows will automatically delete the file. But TerCopy will make sure to keep the portion of the file.

Now this may not be always be helpful, but it can be pretty handy sometimes. Say that you copied a movie almost to its end (98%) but an error occurred towards the very end of the file, still by using TeraCopy, not only it'll keep that file but we should be able to watch it afterward (means the almost full movie since towards the end there's nothing but the boring "credits" ;-).

Anyhow, if interested, you can get it from TeraCopy home page and if you want few additional features, then you can get the full paid version as well. But for most of us, the free version is more than enough.

Excellent Disk Defragmenter for Windows: Defraggler

As almost everyone knows, disk fragmentation can be one of the mains reasons behind slowing down your operating system. There are many reasons of course, such as frequent software installations, immovable files or using a singe HUGE partition instead of a few, etc. Anyhow, as times goes on you "will" have to manually defrag the entire HDD.

I'm pretty sure there are many others, but if you've been searching for one of the best yet completely free HDD defrag utility for Microsoft Windows XP, Vista and 7 then Defraggler is one little app that's worth giving a try. It's true that MS Windows does come with one of her own (built into the OS) but there are both commercial and free dedicated utilities that lets you configure a lot of other options that the built-in Windows doesn't offer.

Let's have a look at some of the features of Defraggler


*. Defraggler lets you de-frag the entire HDD, partition or individual folders/files (something that MS Windows tool lacks).

*. Add Or remove files: this is again very useful since say that you have a folder filled with video files that are only there temporarily, then even if the content is fragmented, yet you can manually remove it from the list thus save some time.


*. Very user friendly window (including using colorized methods for indicating the fragmentation levels).

*. Boot-time Defrag support: If you want to achieve the best results concerning the MS Windows system partition, then this is the best method since Defraggler can move some of the locked system files, etc.


*. Change priority: You can either run it using lot of your HDD bandwidth or can defrag the HDD without slowing down it too much thus you can do something while doing it.

*. Free space defragmentation.

*. Check disk for errors.

*.  Search and find files.


*. Quick defrag: This'll do a fast defragmentation (for the impatient geeks :D) but won't give the best possible results though.

 *. Schedule support.

There are among the main features to mention. As said, this is only for MS Windows. If interested, you can download it from this Defraggler home page. As said, in my experience, this is one of the best HDD defrag utility that's also completely free!. Enjoy.

Portable PDF Viewer for MS Windows: Foxit Reader Portable

If you travel a lot and have a USB pen-drive or any portable media with you and looking for a portable PDF reader for Microsoft Windows OS, then Foxit Reader Portable is an excellent choice. Although the original version of the Foxit reader does not have a portable edition thus this is a customized version by the Portable Apps dudes.

All you gotta do is just download the customized setup file and then use the built in installation wizard to extract the content to a folder. Now you can just copy this folder to any portable media that you have (say to a USB pen/HDD, etc or can use the setup wizard to do that automatically for you as well) and switch it to a different computer (only supports MS Windows) and simply launch the Foxit reader from there!.

Another benefit of having a portable reader such as this is, all the changes that you make to the application (preferences, etc) are saved within its extracted folder thus are also applied when you launch it in a different computer thus you don't have to make all the changes manually either.

Main features...


*. 9MB of downloading size (about 34MB when extracted).

*. Includes all the features of the original Foxit reader: Viewing PDF files, search/find text, add-comments, highlight text, tool-bars, etc... they're all there.

*. Launches without modifying any installed software and does not add any registry entries (other than the ones that MS Windows creates automatically).


*. Optimized for the USB drives.


If interested, you can get it from this downloading page and once the downloading completes, just follow the on screen instructions to extract it to a desired location. As soon as Foxit developers release a new version, the portable app developers also make sure to update their database thus make sure to visit their link to check for the updates too.

How to Disable System Restore in Windows 7?

System restore is a pretty useful feature which was implemented by Microsoft in their Windows operating system for restoring your whole system (OS) to a previous state (which is defined by application installations, etc as many knows). But I personally don't like this at all because it has drawbacks rather than useful ones (at least in my opinion).

First, it uses my valuable HDD space for which I cannot blame the OS. But most importantly, even after doing a system restoration, afterwards, you may not be able to uninstall applications (properly) as usual by using Control panel or uninstallers in the applications, etc. So in a way, even though it is certainly helpful (where you can restore your entire OS to a previous point without having to re-install it, etc) but I'd like to manually disable the System restore feature in MS Windows (7 in this case).

How to do that?

Pretty easy actually, just follow the on screen instructions.

1. First right-click on your "My Computer" icon and from the menu choose: "Properties".


2. From the next window, to your left, choose, "Advanced System Settings".


3. Now from the next window, choose the tab called "System Protection".


Once you click on that, you should see a window that shows you details such as current disk usage, the partitions that are being used, etc. Now choose a partition and under "Protection" if it says "On", then it means that Windows is using space on that drive for system restore feature.

4. Just click on a partition and simply click on the button called "Configure" and from the next window under "Restore Settings", choose "Turn off system protection".


5. Now click on the "Apply" button and then press "OK" to close the window.

If you have multiple partitions, then you'll have to manually disable them all using the same method. That's how you completely disable the "troublesome" (not always though :D) system restore feature in Microsoft Windows 7 (Vista instructions should also be similar).

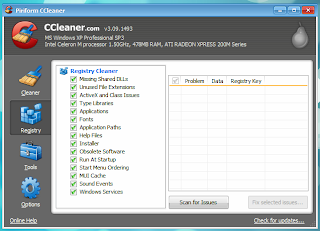
CCleaner: Free Registry & System Cleaner for MS Windows

I came across CCleaner few years ago especially "thanks" my "becoming complicated" internet life. You know, one day I just figured out that suddenly I'm using more than one web browser, installing applications because I thought they were cool (although not that useful :D)... you know the rest :D.

Not only they slowed my MS Windows OS but things like cleaning your Web browser cache will not only help to free-up some space, but most importantly, it helps to keep a secure system which is a lot, hacker-safe as well.

So like me, if you're finding that suddenly you gotta keep handling a lot of applications and have to manually clean their temporary file on daily basis, and looking for something that cleans/repairs more than your MS Windows Registry but lets you do things like clean Firefox, Google Chrome and several other web browsers cache, clean the Windows history files and a hell lot of other well known applications-based temporary files in general, I honestly haven't found one (a free one actually) that that beats CCleaner for what it does :).

Although not many, but Ubuntu OS also seems to be getting some similar ones such as Bleachbit and SystemClean for instance but this one is unfortunately for the MS Windows users only. CCleaner has a very simple GUI and even lets you securely wipe/delete the free space on your partitions too.


Main features...

Removes:

*. Windows File Explorer cache of: Recent documents, RUN, search auto-complete, etc.

*. Empty your Recycle bin.

*. Cleans the memory dump files.

*. Clipboard cache.

*. Windows CHK (check disk) file logs.

*. Missing Desktop/Startmenu shortcuts.

*. Windows Prefetch data:

This actually is a helpful feature which started with Windows XP. It loads portions of your most commonly used program data into the system cache while the system is booting. So obviously it helps to speed-up the loading times of applications (since this is helpful, you can either enabled or disable so CCleaner won't modify anything. But as time goes on, I recommend that you clean this because it helps to Windows to start all a new once in a while + helps to resolve prefetch cache related conflicts, if there's any).

*. Menu order, Try area, user assistant history, Windows Location, etc related temporary caches.

When you click on the Applications tab, you'll get a whole new settings that lets you remove temporary file of individuals applications such as:
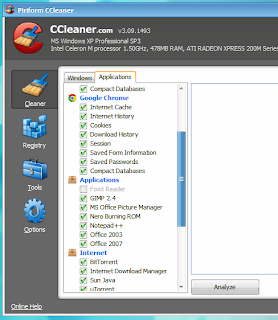
Fraction of the individual apps it supports. Remember, as you install new applications, if CCleaner supports it, then it'll be automatically added after the installation...
*. Mozilla Firefox, Google Chrome, Chromium, Opera, Safari, SRWare Ion (another Chromium derivative), Kmellon, and a hell lot other web browsers related cookies, history, auto-complete search index and browser cache, etc.

*. Multimedia applications such as: KMPlayer, Klite-Codec pack, Windows Media player (yikes!), Adobe Flash player, etc.

*. And a lot of other third party applications such as: Nero, Google Tool-bar, WinZip, Win Rar, Win Ace, MS Office, BitTorrent, IDM, GIMP, Notepad ++, Foxit reader, etc are also supported.

These are really a fraction of its features and supported apps to mention. Apart from that, it also has a built in  registry cleaner (excellent one) too. So after installing and unistalling apps, if you feel like the MS Windows is a bit slow than usual... then after cleaning the temporary settings of those apps you can try cleaning the registry as well.  

But wouldn't let CCleaner get her hands on all the applications on your MS Windows OS either. For instance, I use Foxit Ready quite heavily and if I removed its temporary settings via CCleaner, then Foxit reader will lose her database such as the last page that I was reading on a certain PDF files, etc which is true to other applications. So use it wisely :D.

If interested, you can download it from this official CCleaner home page (it's completely free and does not come with any pain in the as* type ads either!.). It supports Windows 2000, XP, Vista and 7. That's about it.

Redo Backup and Recovery - The Ultimate HDD Data Restoring utility for both GNU/Linux and MS Windows!

Now when it comes to making HDD backups or image backups which lets you completely restore your entire OS within minutes... well Norton Ghost is a pretty good one to mention (although now there are much better ones as well). But I think its about time that we talk about something that is much more powerful, for a change ;-).

It's called Redo Backup and Restore!. It's an OS independent application (in a way) and can be installed into a CD/DVD or USB thus giving you a graphical boot-able environment. It's an advanced "HDD utility" and is actually a more than just another "standard backup tool" because it lets you do things like...

*. Very user friendly GUI.

*. Take partition or entire HDD backups.


*. Perform advanced tasks such as HDD partition resizing, checking for errors, change mount-points, encrypt volumes, benchmark testing, etc.


*. Restore/backup data to local HDD or network drives.

*. Comes with the Firefox web browser (in a Google Chrome type interface, skin actually) by using it you can browse the web (obviously :P) and search for missing drivers or troubleshooting tips for you PC, etc which can be extremely useful.  

*. Change the appearance of the GUI (it feels like an entire OS).


*. Comes with few other tools such as a file recover application, file browser (thunar) for manually copying files you want into a CD or a USB, network drive, heck it even comes with a Terminal emulator (which is useful if you want to run a grub-boot-loader related commands from the installed GNU/Linux SO or launching other commands, etc), text file editor, image viewer, etc.

System Requirements...

*. Intel/AMD CPU.

*. 512MB of RAM (although you can run it in lower RAM PCs too).

Remember, you can't burn the ISO image directly to a USB drive. First you'll have to make a LiveCD (by burning it into a CD) and then boot-into "Redo" and from the main menu icon choose : "Administration" - "Create Bootable USB" and follow the on-screen instructions. 

Seriously!, what else they're missing :D. As said, it's an OS independent utility, although you can make backups or MS Windows and GNU/Linux files systems only (no Mac OSX support, yet, I guess ;-)). You can download the latest version 1.0 from this page.

And finally I'd like to give a big thank you for the developers, it's not just that they've created something excellent and robust but it's completely free and released under the GNU/GPL license too!. So, to everyone who particitaped in creating this amazing utility called Redo Backup & Restore, thank you.